If you have content in custom post types with Advance Custom Fields, either the free or pro version of their plugin, that data can be accessed and displayed using Kadence Elements Templating and dynamic content. To do so, you will need to have Kadence Theme Pro plugin installed as well as Kadence Blocks Pro plugin installed. We recommend starting with the Kadence Essentials Bundle if you’re using Kadence Elements Templating with Advanced Custom Fields.
For this overview, we will assume that you have some familiarity with Advanced Custom Fields and we’ll focus on how to display your content using Kadence Elements Templating and Dynamic Content. For an overview of how and when to set up custom post types, refer to our blog tutorial on how and when you might want to use dynamic content and custom post types.
Before working with Kadence Elements Templates and your custom post types, it is important to have some model content to work with. If you haven’t yet set up your custom post types with the content, do that first.
Creative use of Custom Post Type Content
The great thing about working with Kadence Elements Templates and custom post types is that many Kadence Blocks can access custom post type data to pull in dynamic images, dynamic categories, and much more.
Accessing custom post types within Kadence Elements Templates
Before accessing custom post types in Kadence Elements Templates, ensure that you have Hooked Elements toggled on in the Kadence settings. Head to Appearance > Kadence and turn on Hooked Elements. This will add a sidebar menu item under Appearance > Kadence to easily access Elements.
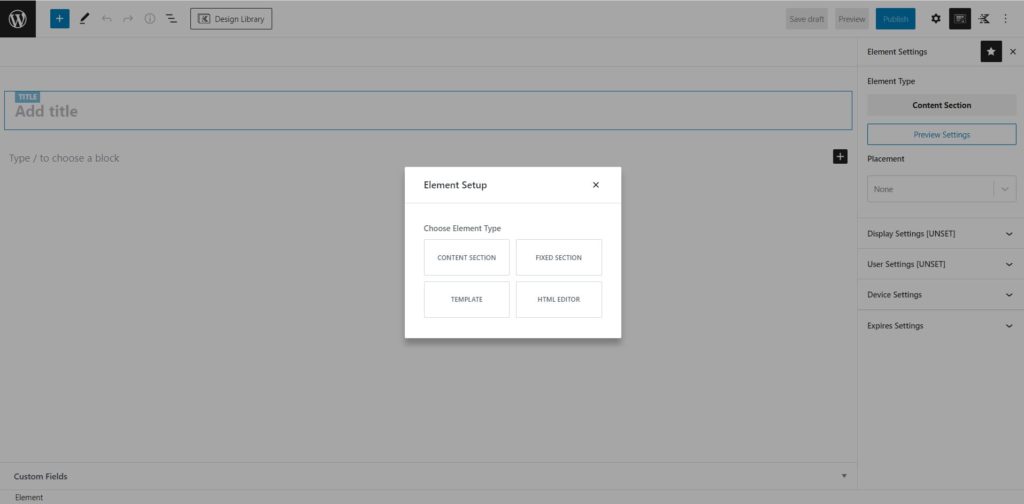
Click on Elements and then Add New. Next, you’ll see a dialog asking you to choose the type of Element you would like to create. For this example, we’re creating a template.
Establish Template Settings
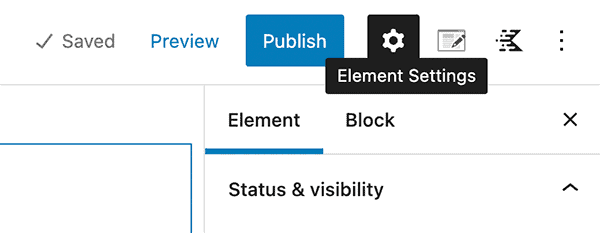
In the upper right corner, toggle into your Kadence Element Settings.
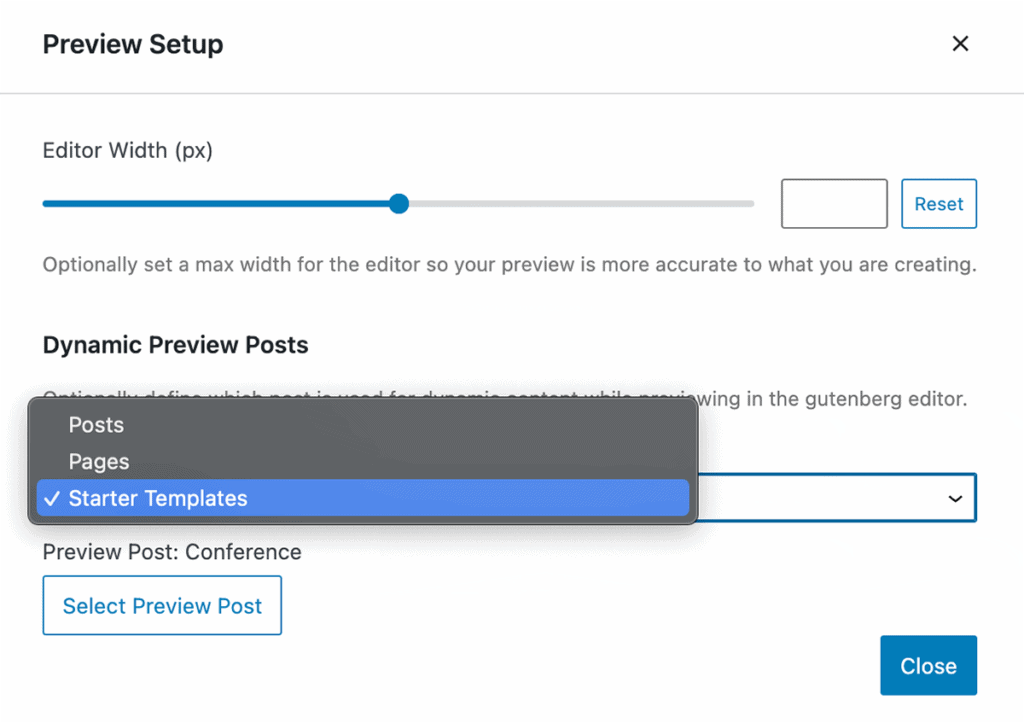
Set your Preview Settings. Here, you will choose which of your content entries you will use to model what your template will look like.
For editor settings, if you are setting a full page template, you can leave this blank and it will inherit from your theme. If you are setting up a template that will be a different width, set it here. If you are setting up a template that will be repeated, for example in an archive page, you can set the width here. The purpose of this is to ensure that you are seeing a reasonable representation of what your front end will look like while you are designing your template in the block editor.
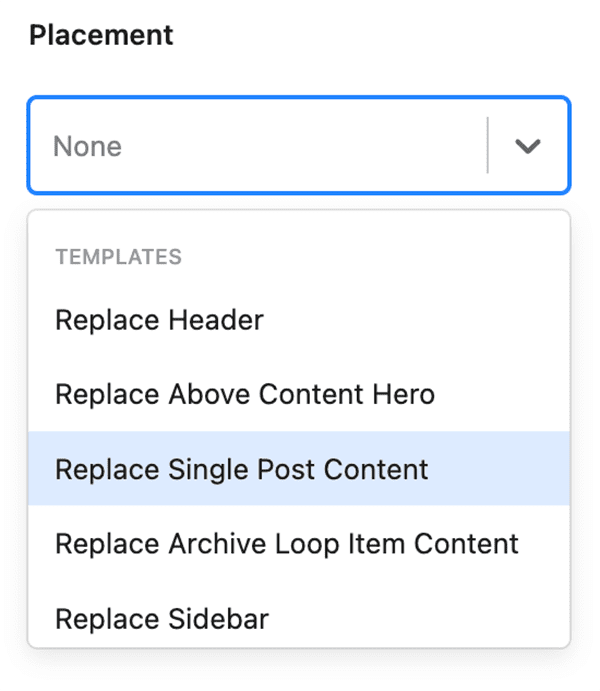
Set your Placement Settings. Placement tells Kadence Elements where you will be placing the template you’re designing. In the case of a template, we are replacing content on a page somewhere on your site.
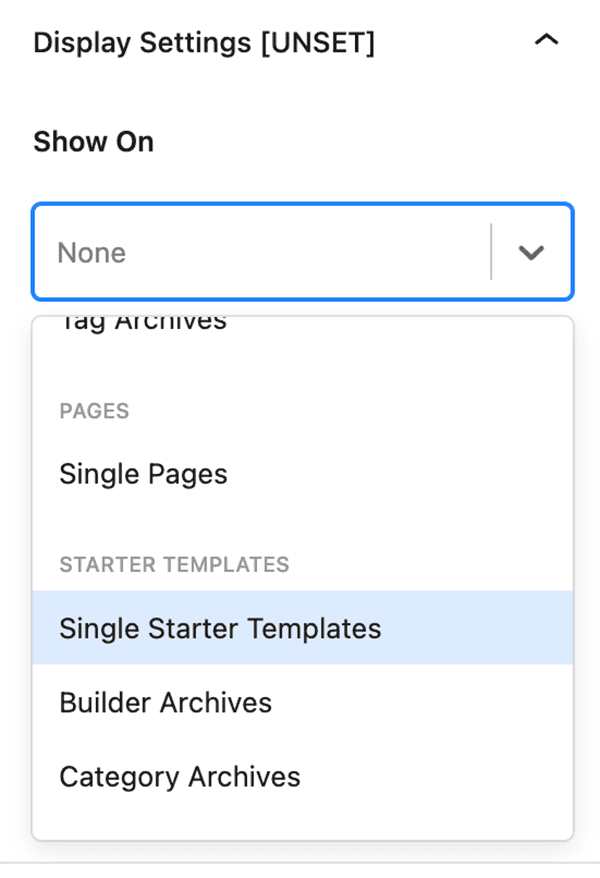
Set your Display Settings. Display settings lets you determine where your element will be displayed. These can be set to display on specific portions of your site, or to exclude from specific portions of your site, and you can get as granular as you’d like with your settings.
Set your User Settings. This is optional. User settings can be set by any user role that is set on your site. For example, you can choose to show to logged in users, logged out users, or any user role that you have. You can add rules so that you can show your template to administrators and shop managers, for example, by adding rules. Of course, keep in mind that if you’re limiting a Kadence Elements Template to show to a specific user role, then that user will need to be logged into your site in order to see it.
Set your Device Settings. This is optional. To add devices to your Kadence Template, choose which devices you would like your template to apply to: desktop, tablet, or mobile device. If this is not set, your template will show to all devices.
Begin building your template
We recommend using the Row Layout Block and Section Block to contain your content, and you can nest the content within these as needed. Using the Row Layout Block and Section Block allows you to access dynamic content for backgrounds and even choose to display some content conditionally if desired.
As your layout will be uniquely yours containing your customized content, you’ll need to determine where and how your content should be displayed. Here, we’ll show how to access dynamic content with a few of the Kadence Blocks. Note that these are only available in the Kadence Blocks Pro version.
Dynamic Content in Templates
Any field in your custom post type is automatically accessible to Kadence Elements. That means that your Post Title, Post Excerpt, Post URL, Post ID, Post Date, Post Last Modified Date, Featured Image, Featured Image URL, Post Type, Post Status, as well as all of your custom post types are available to be displayed in your template. Here are some of the ways you can display your custom post type information on your Kadence Elements Template.
Wherever you see the dynamic content icon, you can access your custom fields in your template.
Row Layout Block Dynamic Content
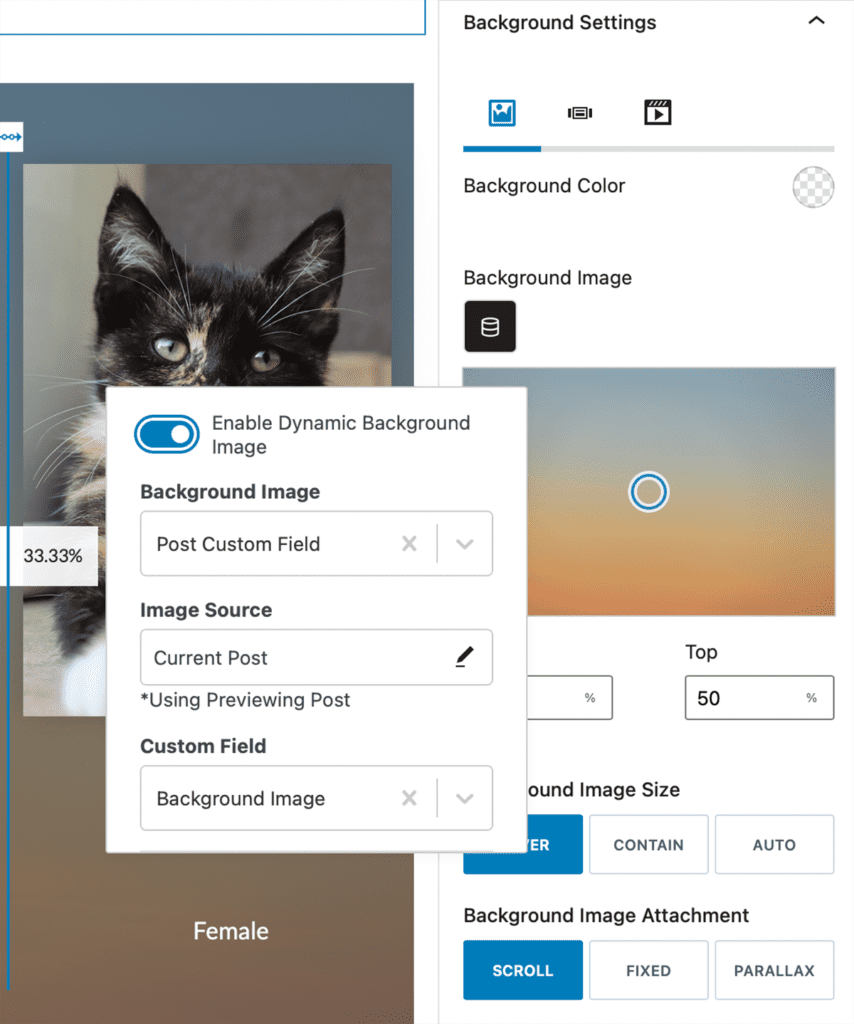
Wouldn’t it be great to add a dynamic background that can be set on the custom post type? With Kadence Elements Templates, you can pull in a dynamic image that is set in your custom post type. In the right sidebar, go to Background Settings and then click the dynamic content icon. Click the toggle on for Enable Dynamic Background Image, then find the image that you would like to use. In our example, we have a field called “Background Image” that is being used for the background of the record being displayed. This could also easily be used as a banner image or any other dynamic display of an image background.
Section Block Dynamic Content
A Section Block can access a number of dynamic elements, and it can contain text, images, and other content that can access dynamic elements as well. And, Section Blocks can be contained within a Row Layout Block or inside of another Section Block, giving it a number of ways to display and contain dynamic content.
As with the Row Layout Block, you can set a Section Block to have a dynamic background within a template as well. First, Enable Dynamic Background Image, and find the custom field that contains the dynamic image you would like to show. This could also be the post featured image if desired.
Advanced Text Dynamic Content
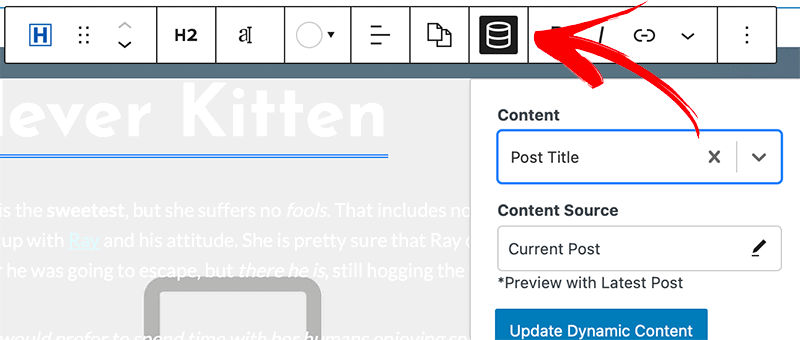
The Advanced Text Block will likely be one of the primary blocks that you use in order to access your custom post type data. Accessing the data is easy. First, place the Advanced Text Block. Then, click the dynamic content icon on the block bar. Find the content you’d like to place. If it is within your Post Custom Fields, click the “Post Custom Field” to open additional dialogues to find the specific field.
You can add fixed text interspersed with dynamic text within the Advanced Text Block.
Advanced Image Dynamic Content
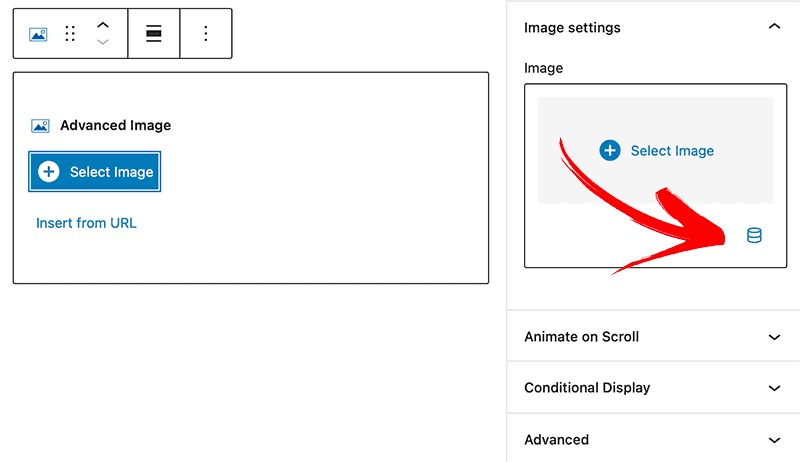
The Kadence Advanced Image Block contains a number of settings above and beyond a standard image block, but the dynamic portion of the Advanced Image Block might be the most powerful. You can use the Advanced Image Block to access the post featured image or any other image field that you might have added to your custom post fields. To access your dynamic content, first place the Advanced Image Block. You’ll see an option to select an image, but this would be for fixed content. You can still add fixed images to a template, but to access dynamic images, head to the right sidebar and click the dynamic content icon under Image Settings.
Next, click the toggle to Enable Dynamic Image.
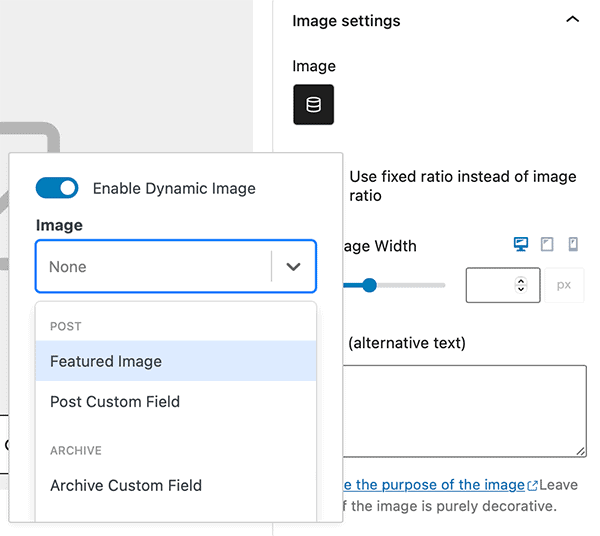
You can also choose to animate the image on scroll, or even show the image conditionally. For example, if you do not want to show an image if there is none entered, you can choose to conditionally show the block if the image exists. In the example below, we are only showing the advanced image if the featured image URL is not empty (e.g., if there is a featured image, then show this advanced image block).
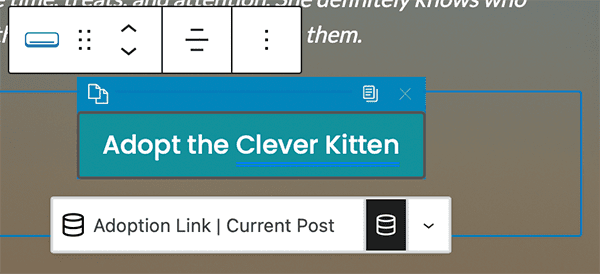
Advanced Button Dynamic Content
Both the text on your Advanced Button and the link to which your user will be directed can be set with Kadence Elements Templates. As well, you can set the text on the button to be static and the link dynamic, or you can have the text be dynamic and the link static. Both are easily set.
To set the text on an advanced button to your dynamic content, click the dynamic content icon and then find the dynamic content you’d like your button text to contain.
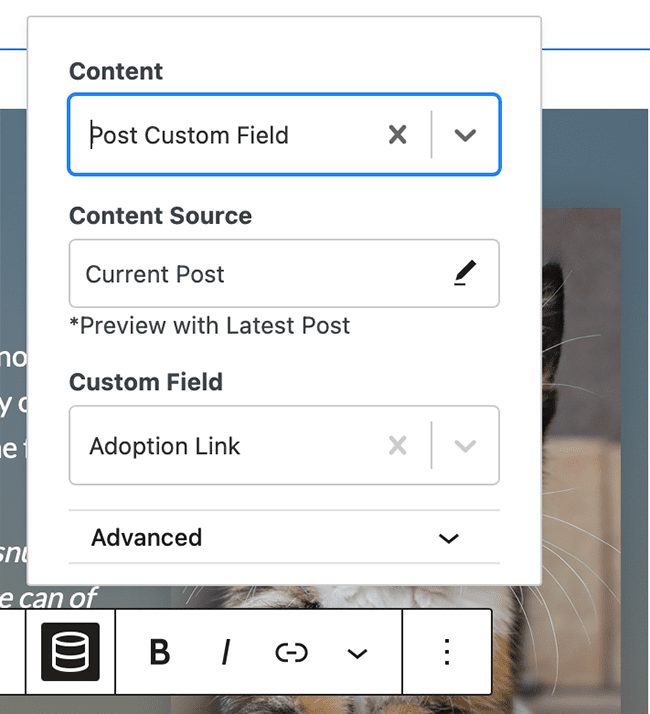
In our example Advanced Button Block below, we’ve intermingled static content and the Post Title for the button text, and we’ve added the “Adoption Link” custom post field for the dynamic link.
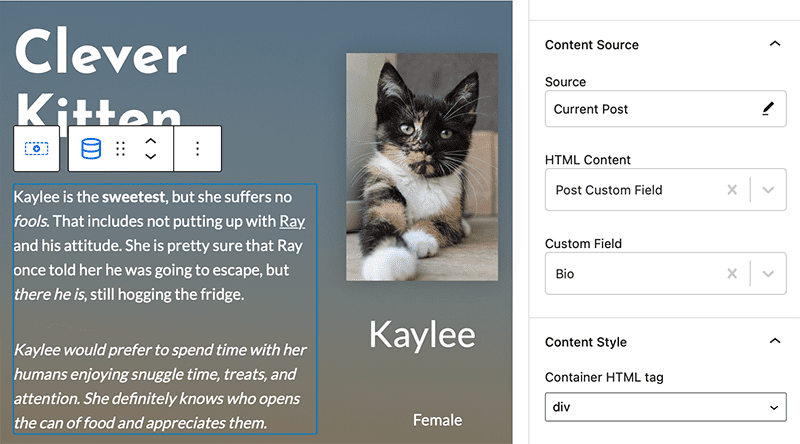
Dynamic HTML Block
Often, we need to provide our users the ability to add minor HTML such as bolding, italics, or even links to the content that we need to display dynamically. In these cases, the WYSIWYG editor available in Advanced Custom Fields combined with the Kadence Dynamic HTML Block is the perfect solution.
Within the Dynamic HTML Block, choose your Content Source. Ensure that the content you’re pulling in is within the WYSIWYG field in ACF.
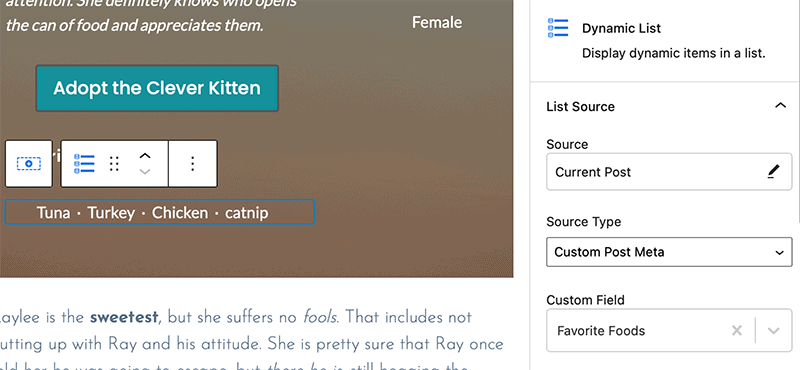
Dynamic List Block
The Dynamic List Block is a perfect way to display information that was entered in as checkboxes or select drop downs. This block can also be used for post taxonomies, but in this implementation, we’re using custom post types. Find the field you’re displaying via the block settings in the sidebar.