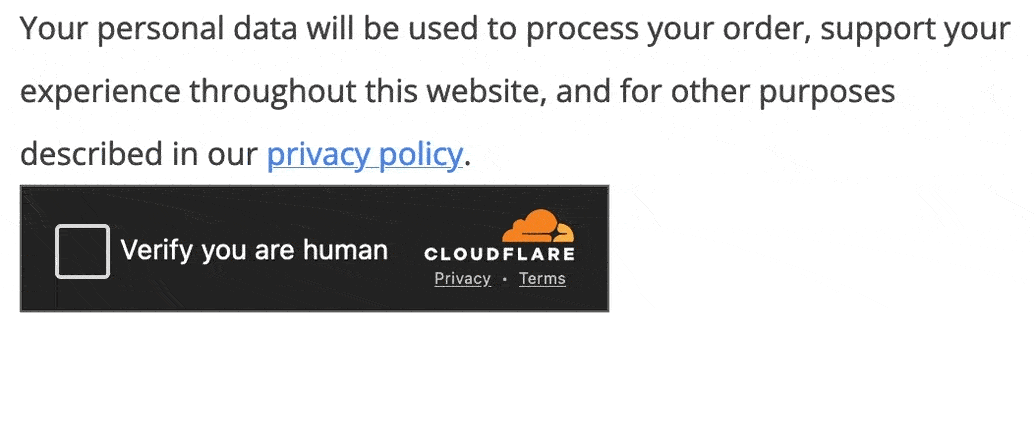
Kadence CAPTCHA allows you to add either Google’s reCAPTCHA service or Cloudflare’s Turnstile service to your website. Kadence CAPTCHA can be used on Forms across your website, such as the Login Form, Registration Form, and/or the WooCommerce Review Form. Connect reCAPTCHA or Turnstile to Kadence CAPTCHA and enable the places you wish to use CAPTCHA features.
Available Integrations
Kadence CAPTCHA offers the ability to use either Google reCAPTCHA v2/v3 or Cloudflare Turnstile. These are third-party services outside of Kadence. You will need to create an account for your selected service, complete the setup steps for that service, and then use the provided API to connect it to Kadence CAPTCHA.
Learn about getting started with Google reCAPTCHA Here.
Learn about getting started with Cloudflare Turnstile Here.
Installing and Activating Kadence CAPTCHA
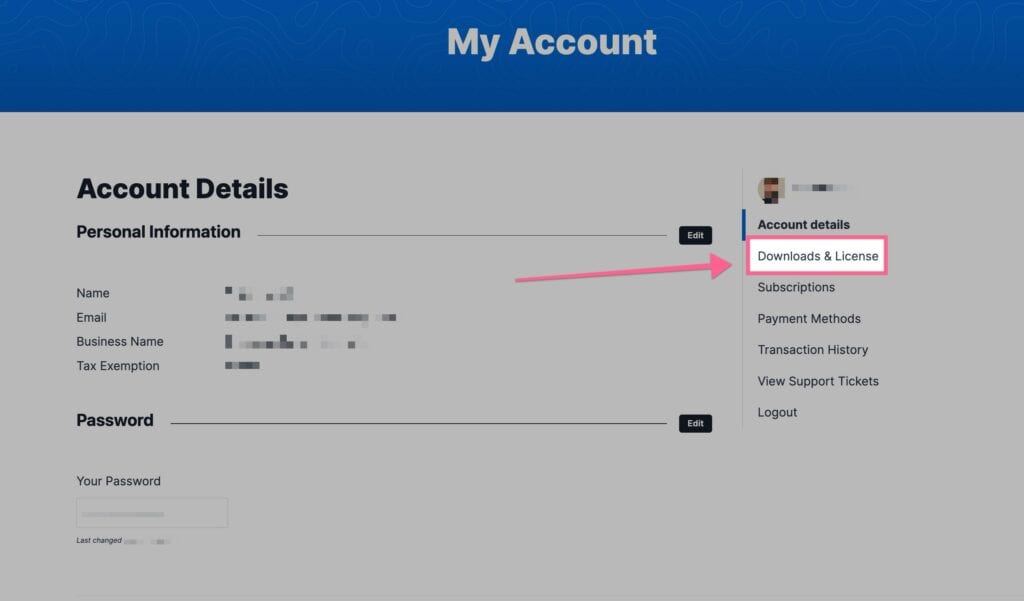
You can download the Kadence CAPTCHA plugin if you have access to the Full Bundle or greater. You can view our pricing Here.
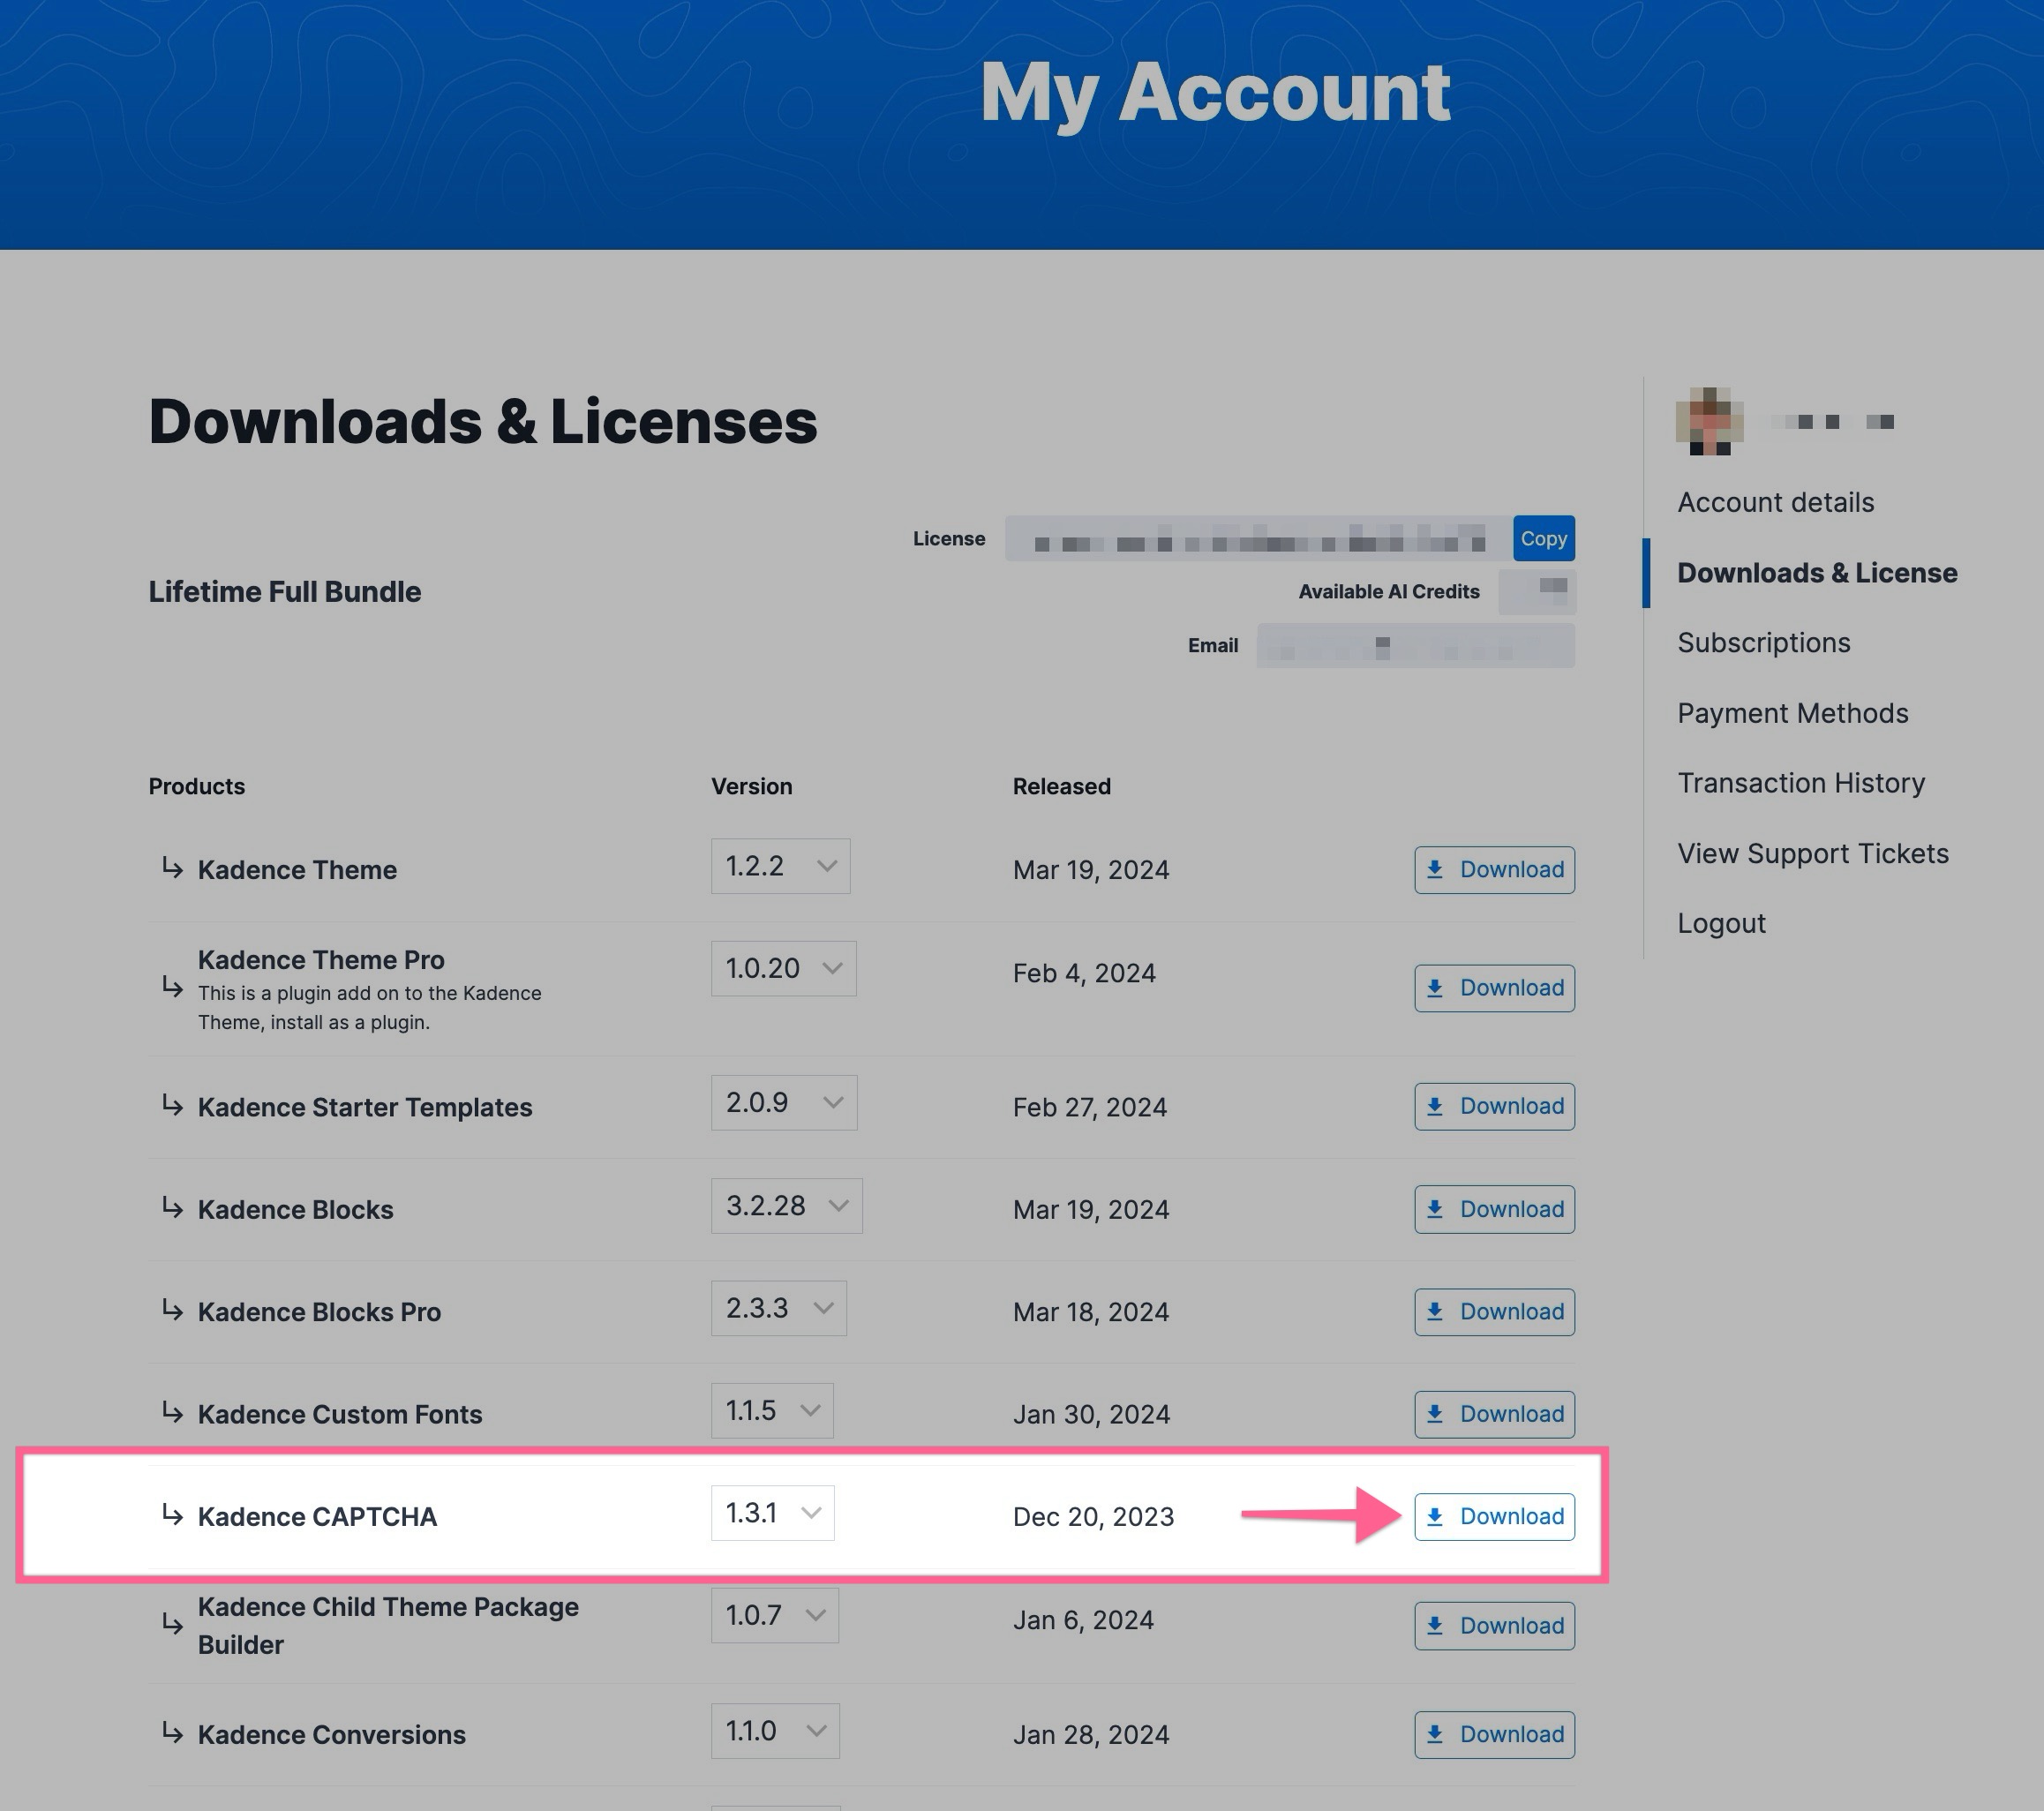
Once you have access to the Kadence CAPTCHA Plugin, you can download it from your KadenceWP Downloads & License page.
You will see Kadence CAPTCHA listed in your Products list. You can click on the Download button to download the Kadence CAPTCHA Zip. Be sure to leave the file compressed and don’t unzip it.
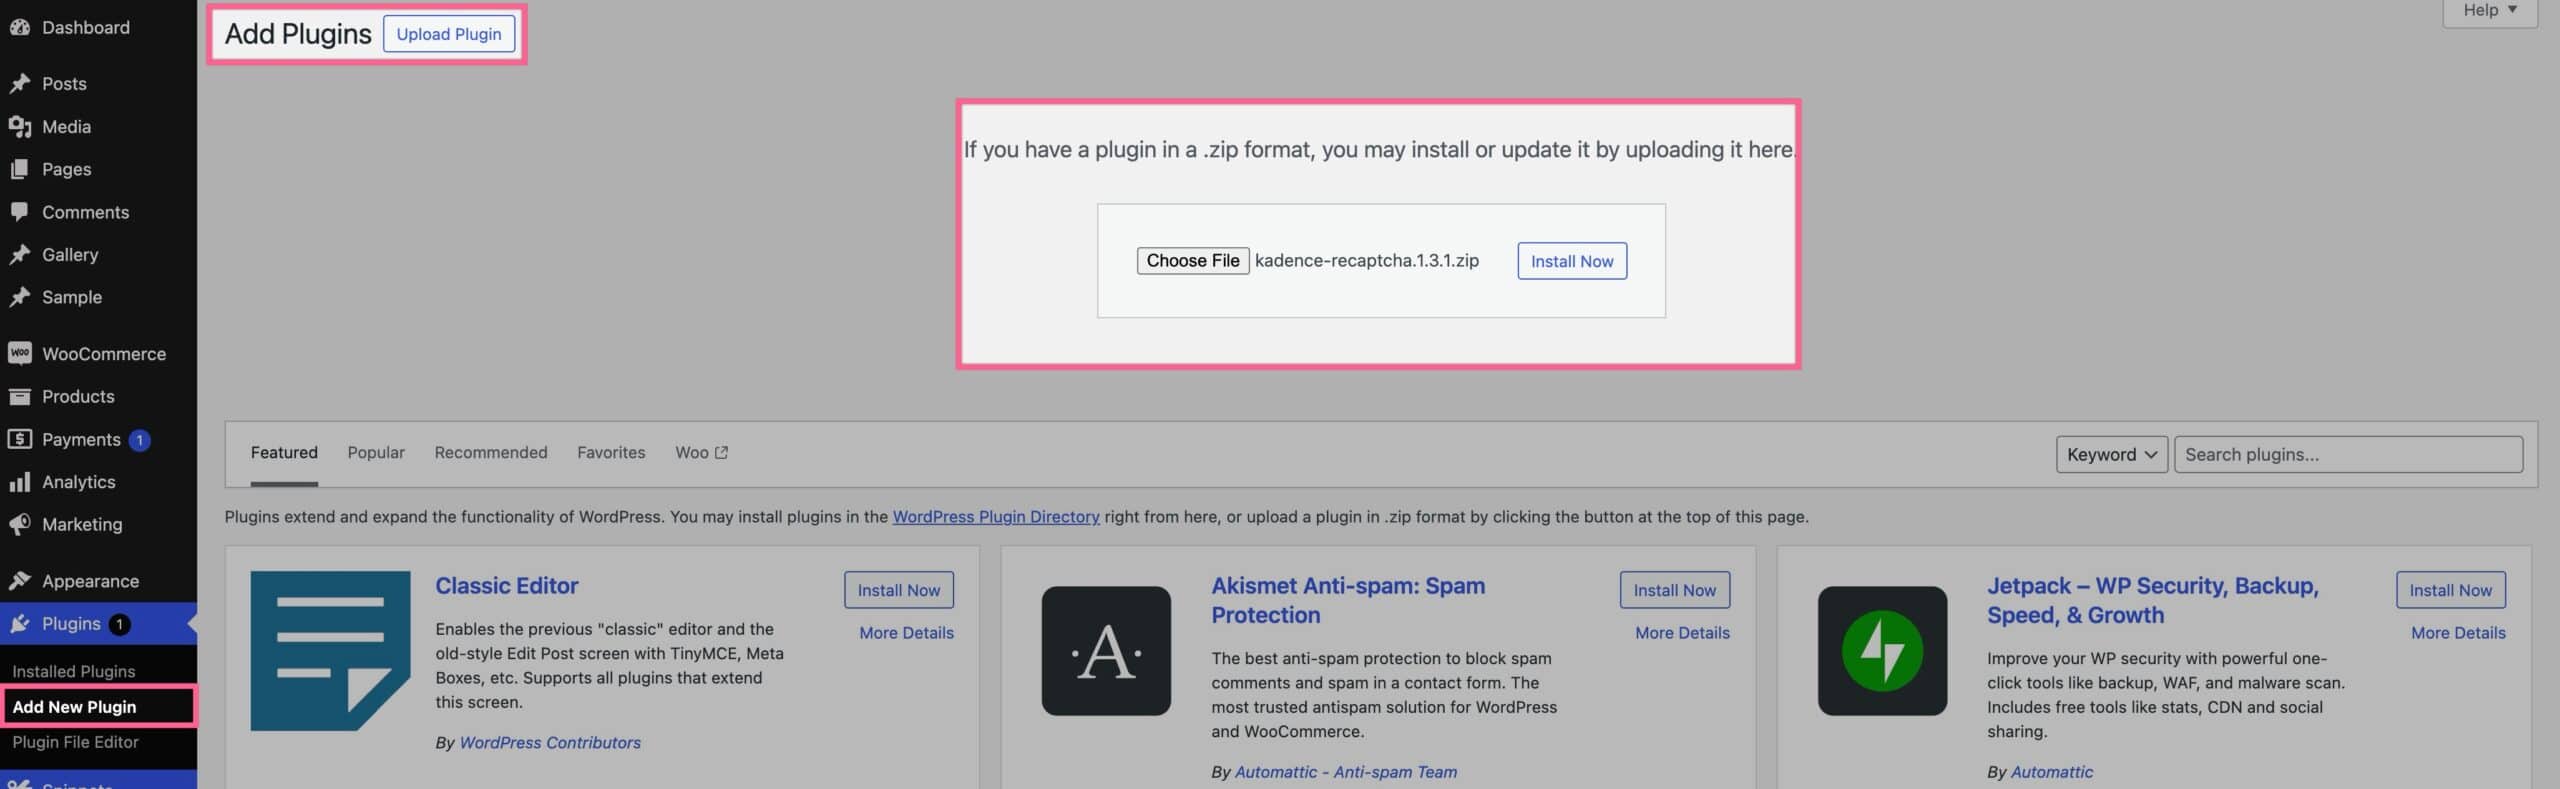
You can upload your Zip file by going to your WordPress Dashboard -> Plugins -> Add New Plugin. Then you can click on the Upload Plugin button at the top of the page. This will allow you to choose a file. Pick the Kadence CAPTCHA Zip File downloaded from your KadenceWP Account.
Setting up Google Recaptcha
To use the Kadence CAPTCHA plugin with Google RECAPTCHA, a Google Account must be created, and the website using Kadence CAPTCHA must be connected to it. Once an account is set up, use the Google Admin Panel to Add a New Site.
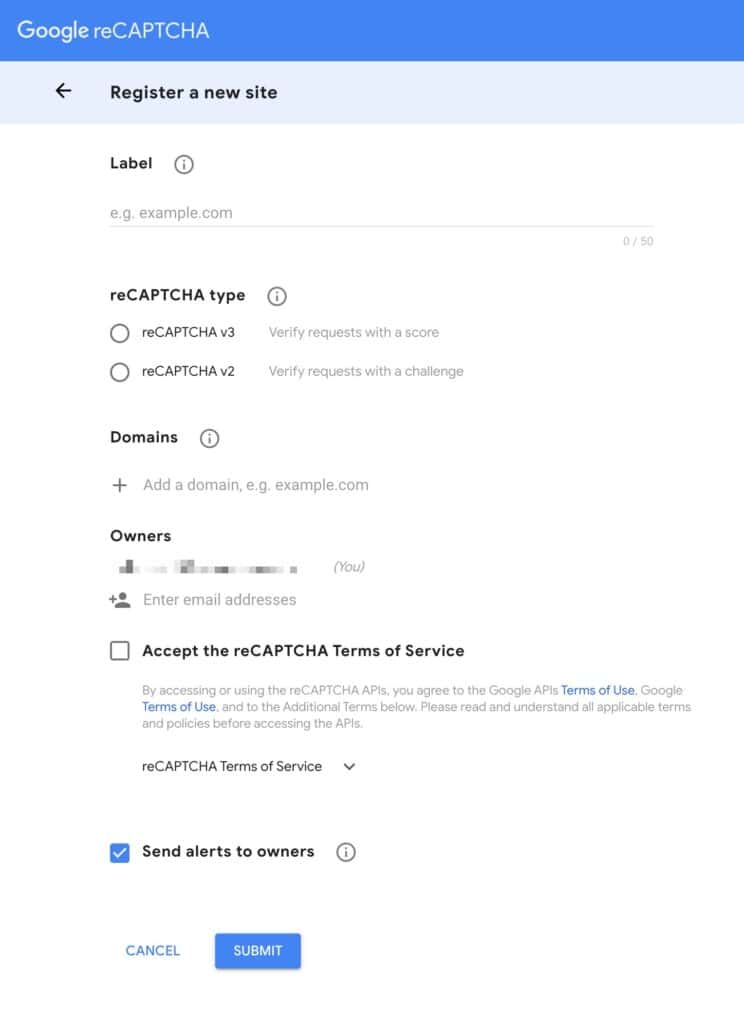
Once on the page to register a new site, fill out the details accordingly.
Set the Label to the preferred label for the website. The label is a unique identifier for the reCAPTCHA configuration.
The reCAPTCHA type can be set to either v2 or v3. The primary difference between reCAPTCHA v2 and v3 is their approach to detecting bots.
reCAPTCHA v2 relies on challenge-response tests, such as clicking on images or selecting checkboxes. This requires direct user interaction to verify non-bot status.
reCAPTCHA v3 uses a scoring system that assesses user interactions without user involvement. This runs in the background to analyze behavior and assign a score. This makes v3 less intrusive and offers a smoother user experience, though it raises privacy concerns due to the data collection involved.
Next, add the domain. This should match the website domain that will be using Kadence CAPTCHA.
Owners can be added to the website by entering and adding their email addresses. Adding owners allows multiple people to manage and monitor the reCAPTCHA settings for the site,
Once finished, accept the Terms of Service and submit the new site.
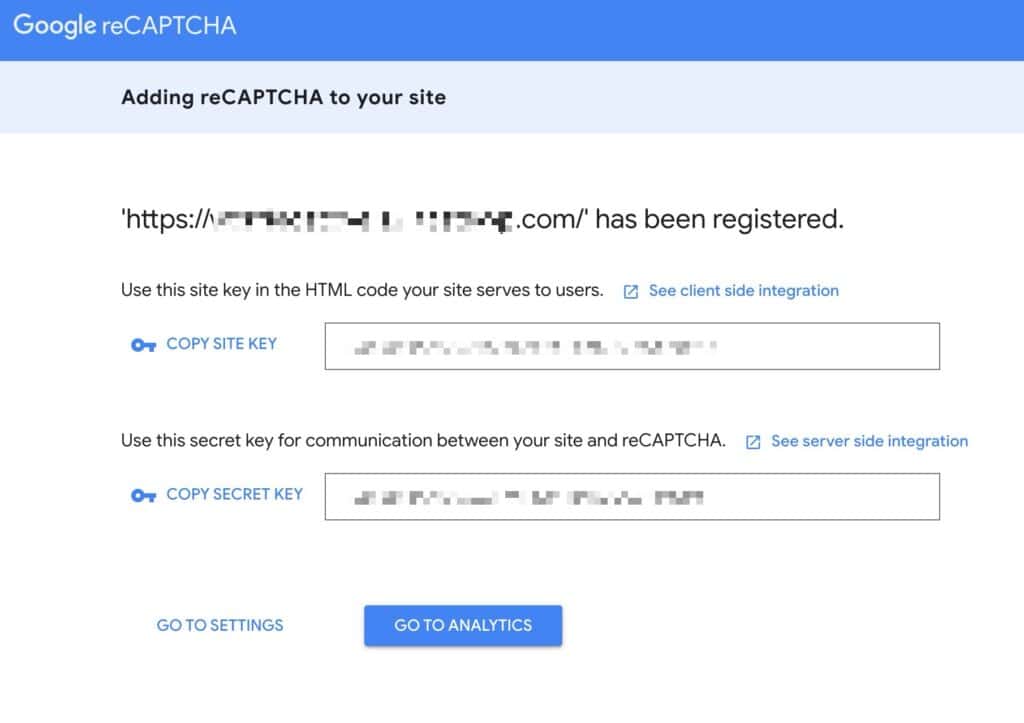
Once site registration is complete, a page displaying the Site Key and Secret Key will appear. These two keys are required for Kadence CAPTCHA integration. It is important to save this page and key details for future reference. (These keys can also be accessed later using the Google Admin Panel)
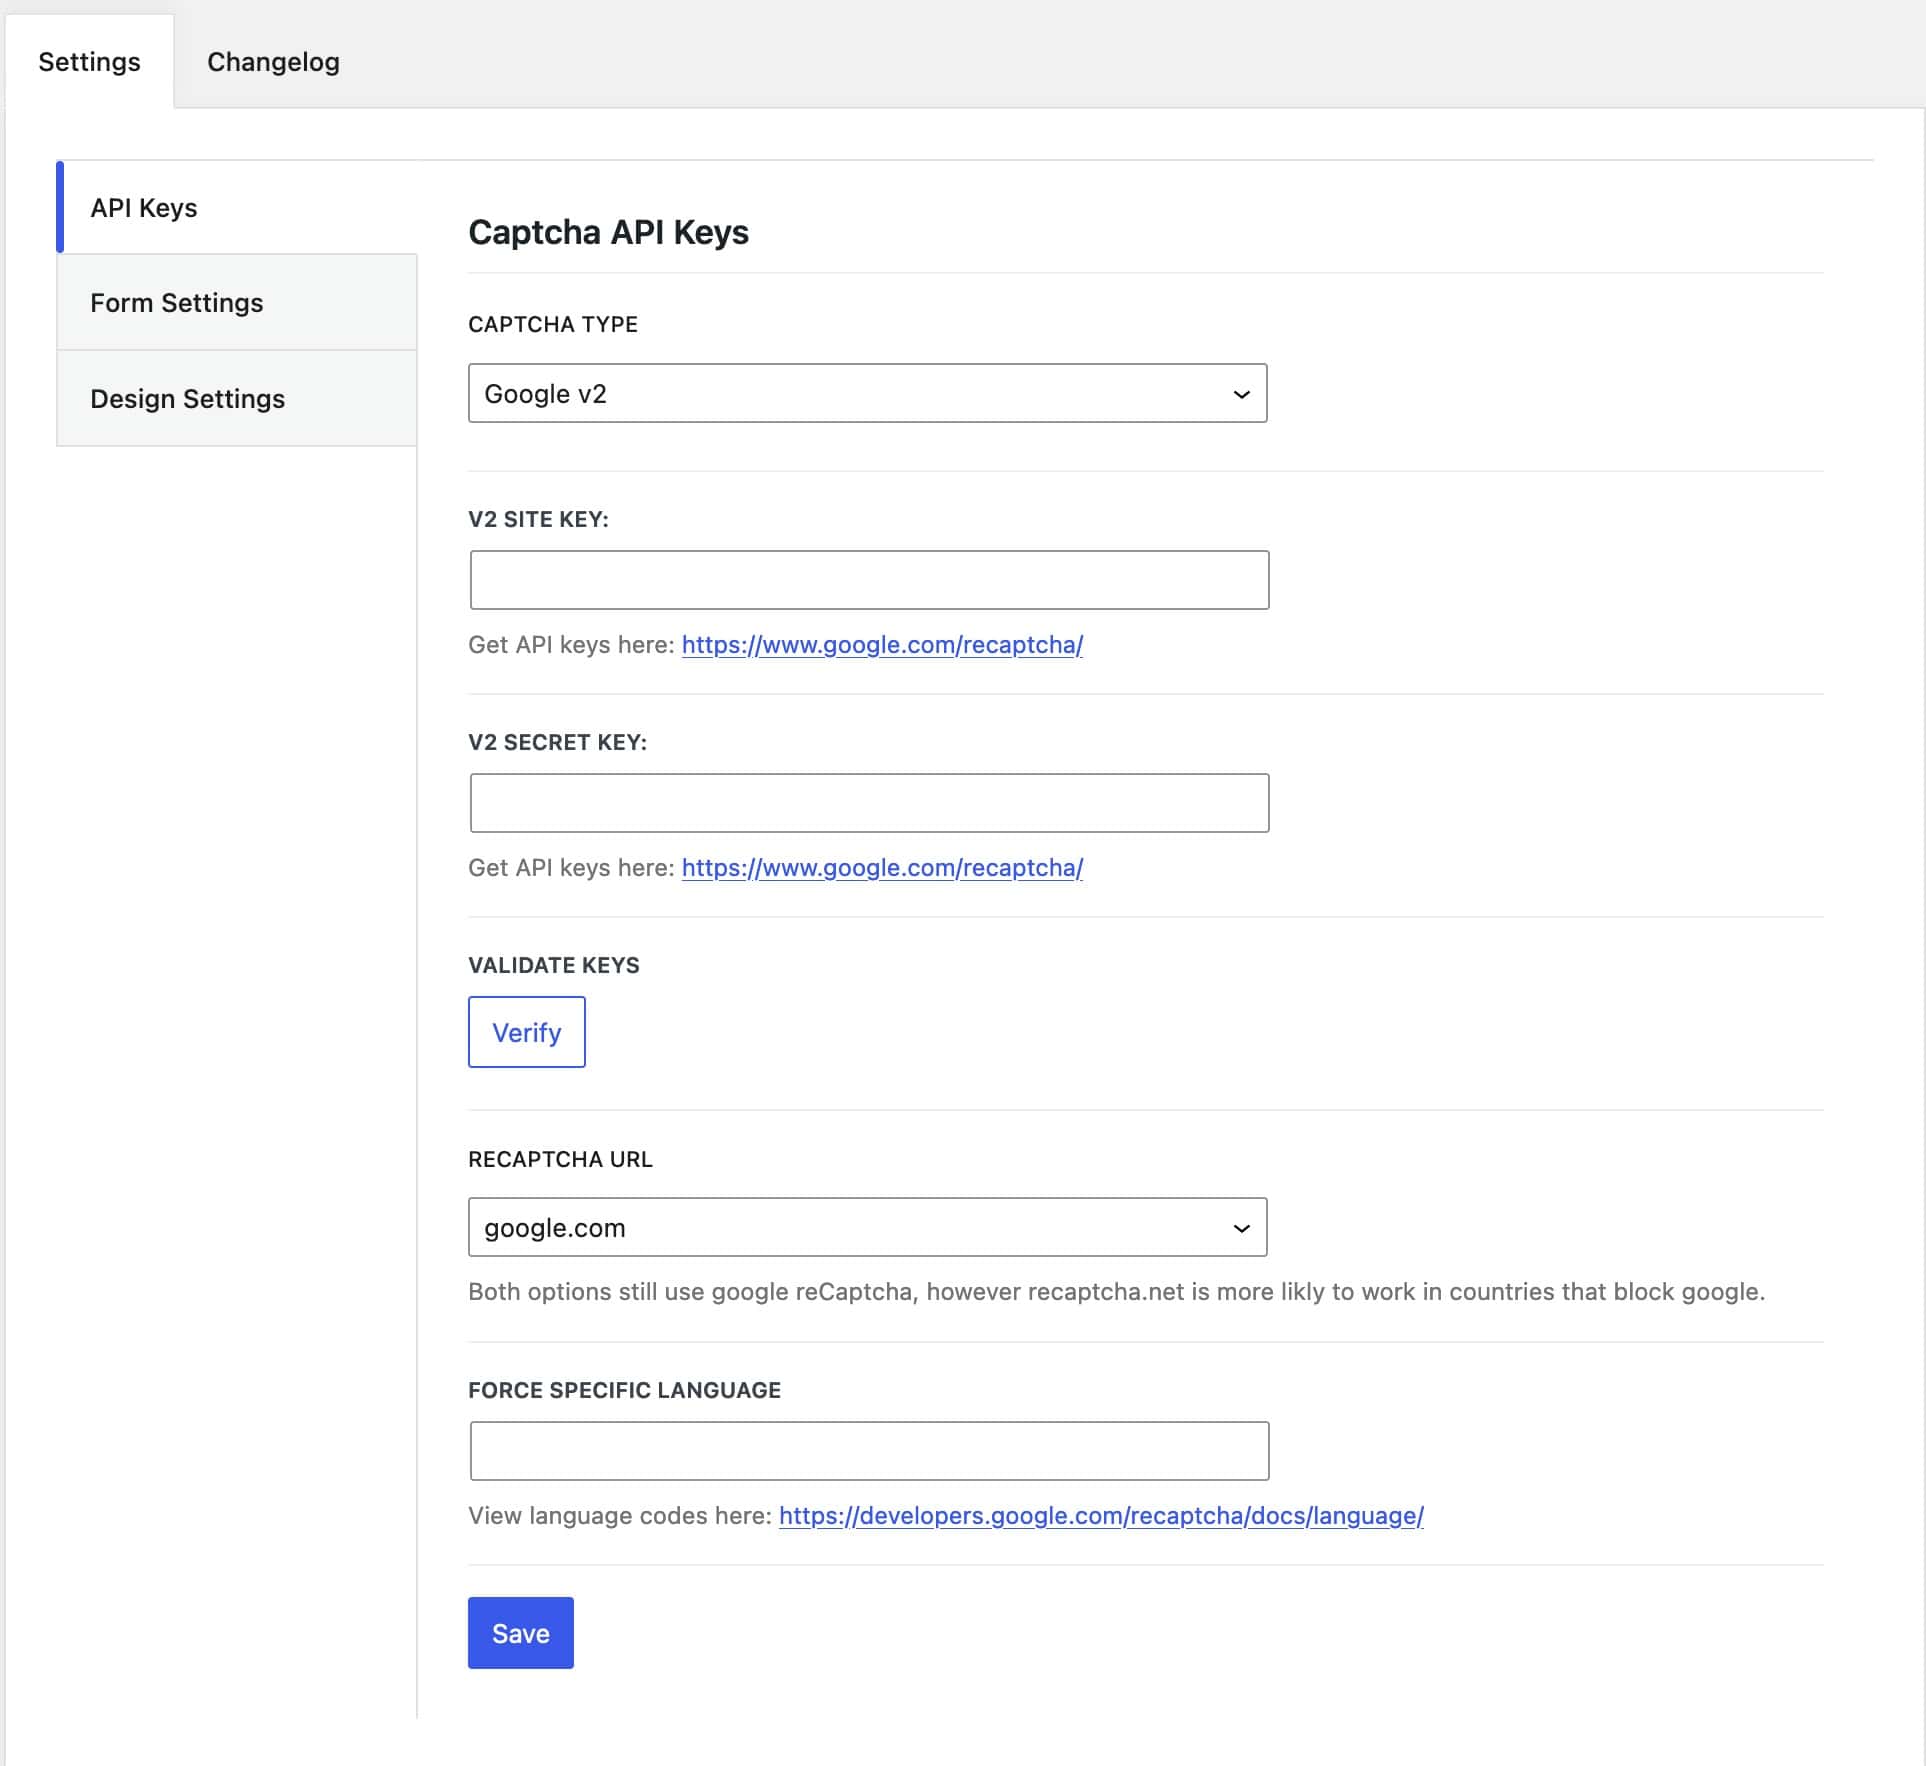
Inputting Google reCAPTCHA v2 Keys
Once CAPTCHA is licensed, go to the Dashboard -> Settings -> CAPTCHA. Under the API Keys tab, select Google v2 from the CAPTCHA Type dropdown.
Add the v2 Site Key and Secret Key. Then, click Verify to validate your keys.
Set the reCAPTCHA URL to either google.com or recaptcha.net. Choosing the appropriate URL can affect performance and reliability based on your site’s geographical location and network conditions.
You can also force a specific language for the reCAPTCHA challenge. This ensures that the CAPTCHA prompts users in a language they understand, improving user experience and accessibility. If left empty, reCAPTCHA will determine the language based on the local user’s settings.
Once you’re done configuring these settings, click Save.
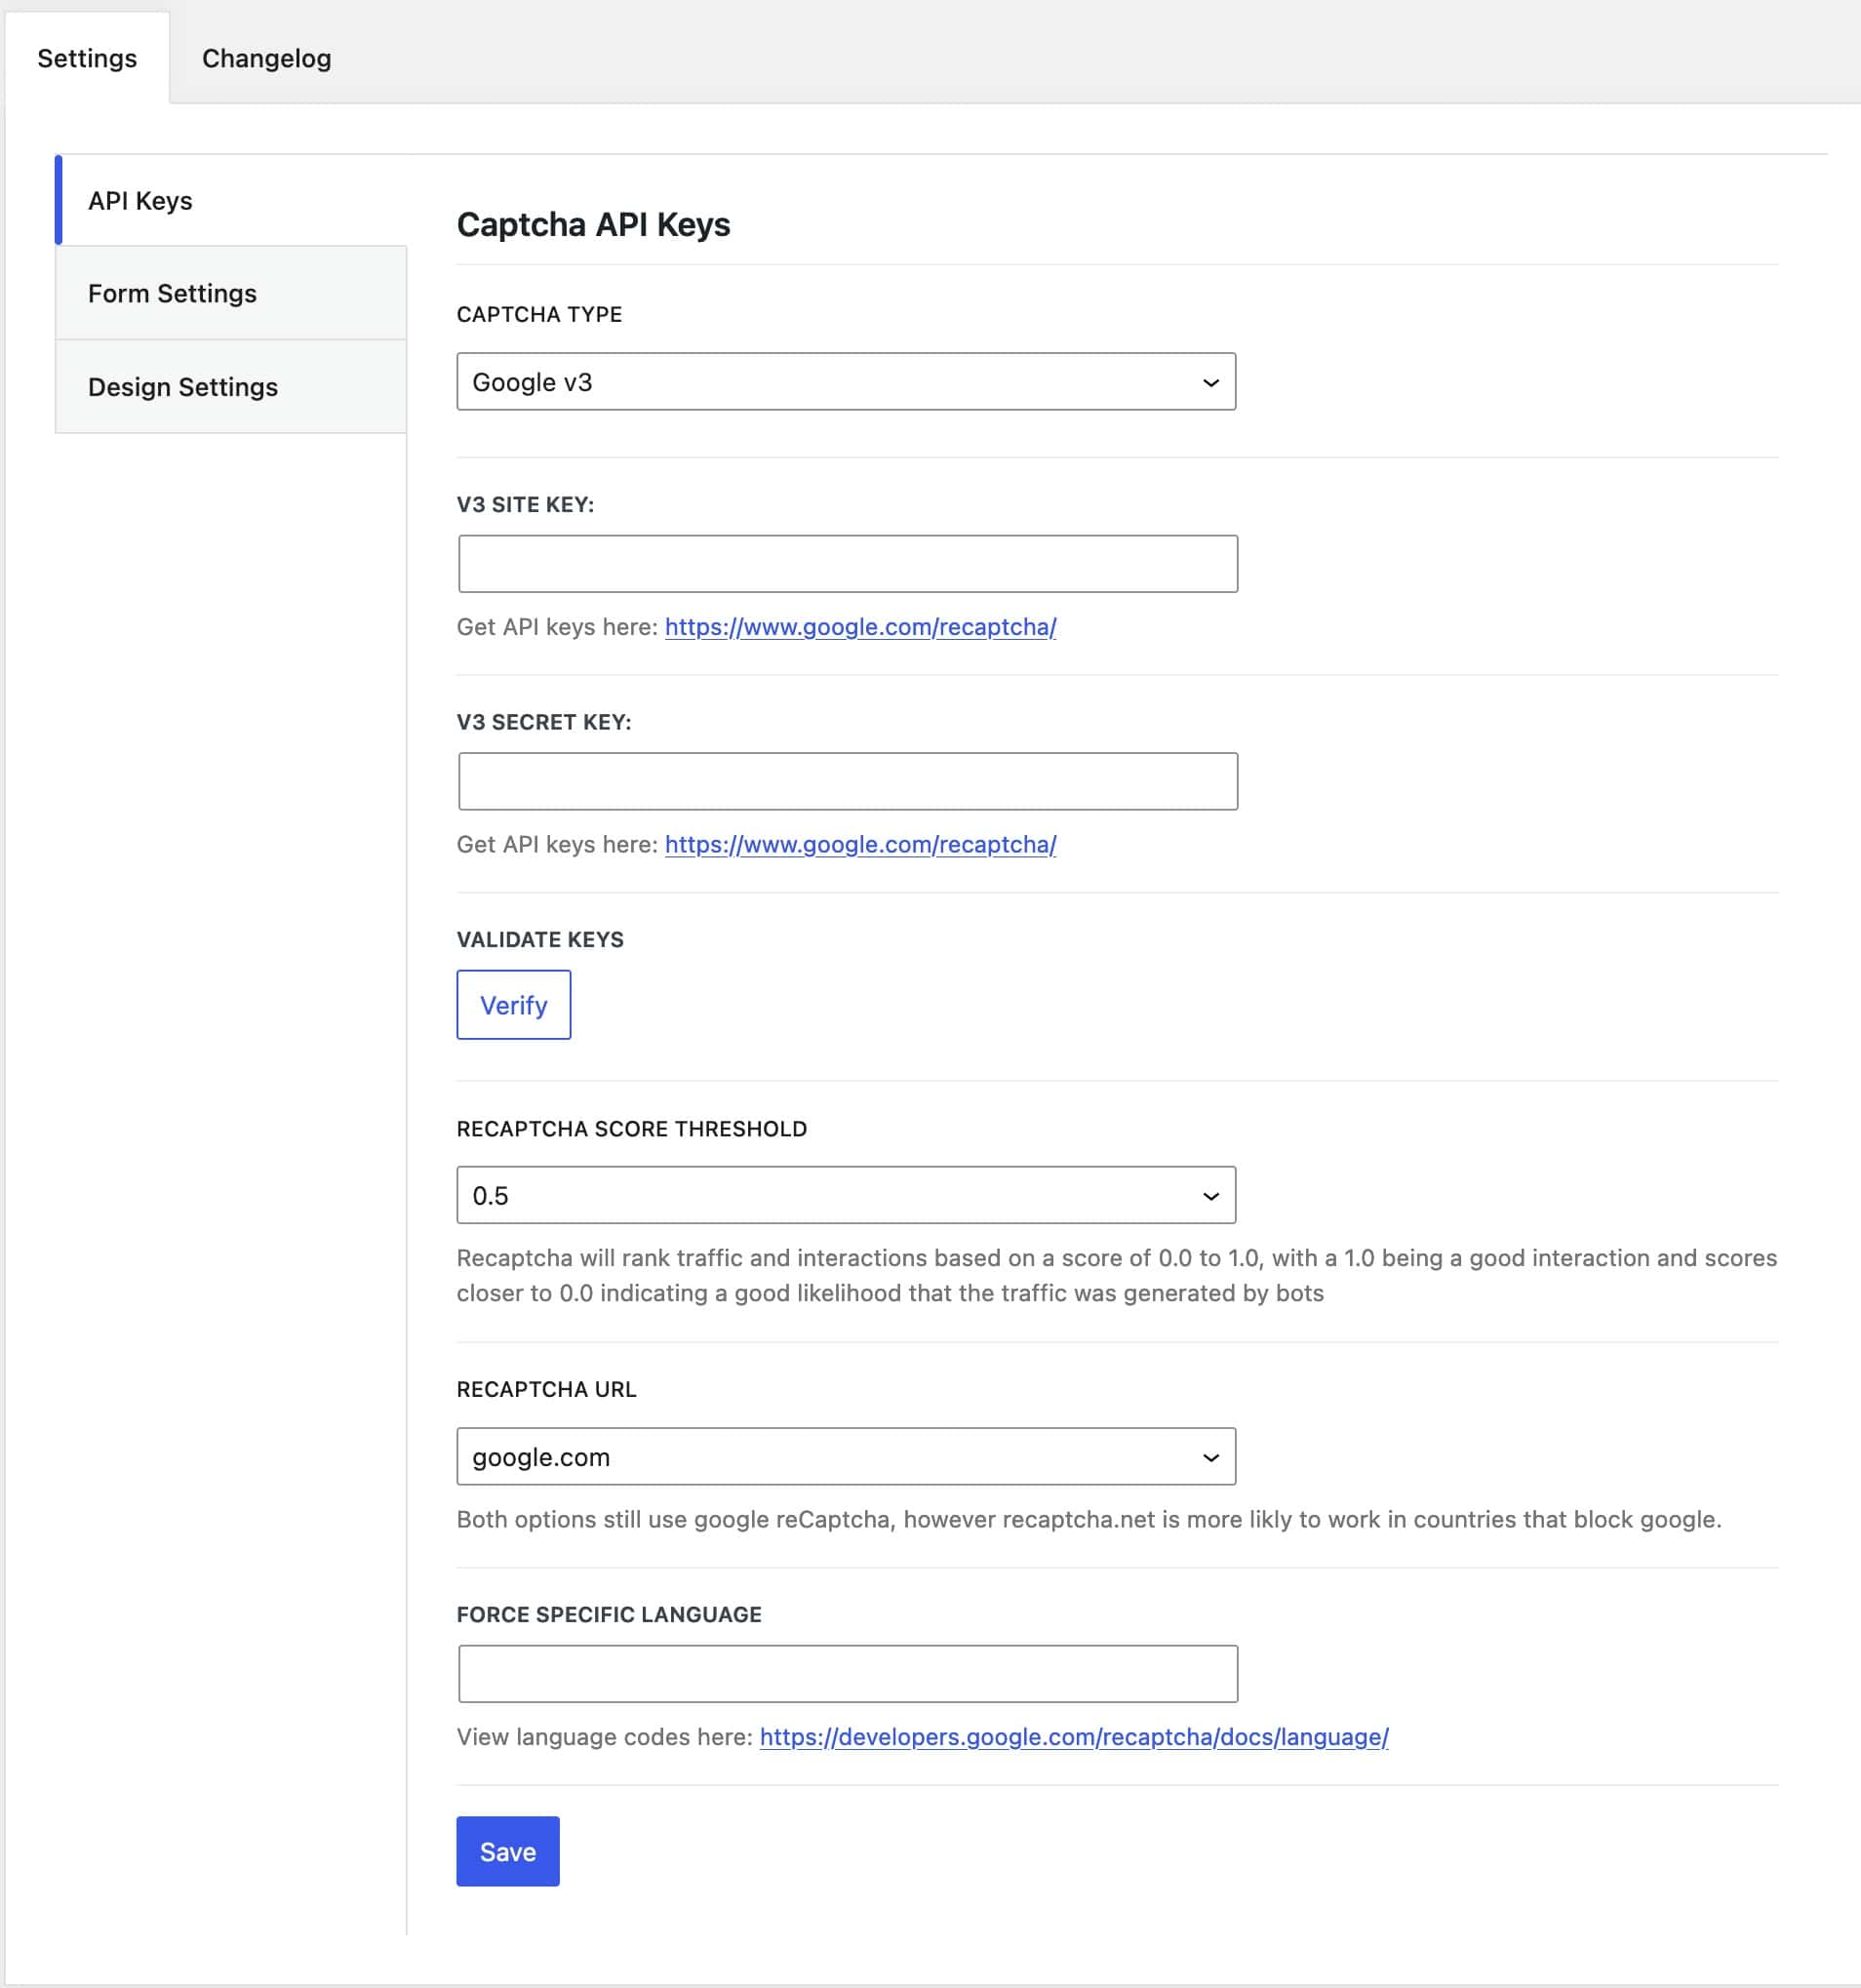
Inputting Google reCAPTCHA v3 keys
To use Google reCAPTCHA v3, go to the Dashboard -> Settings -> CAPTCHA. Under the API Keys tab, select Google v3 from the CAPTCHA Type dropdown.
Add your v3 Site Key and Secret Key. Then, click Verify to validate your keys.
Set a reCAPTCHA Score Threshold. This score ranges from 0.0 to 1.0, with 1.0 indicating legitimate traffic. Scores closer to 0.0 suggest a higher likelihood of bot-generated traffic.
You can also set the reCAPTCHA URL to either google.com or recaptcha.net. Choosing the appropriate URL can impact performance and reliability based on your site’s geographical location and network conditions.
Additionally, you have the option to force a specific language for the reCAPTCHA challenge. If left empty, reCAPTCHA will detect the user’s local language settings.
Once you have configured these settings, click Save.
Setting up CloudFlare Turnstile
To use the Kadence CAPTCHA plugin with Cloudflare Turnstile, a Cloudflare account must be created, and the website should be added to the Cloudflare Turnstile list of sites. A Cloudflare account can be created here.
From the Cloudflare Dashboard, find the Turnstile Tab. Click on it and click on the Add Site button
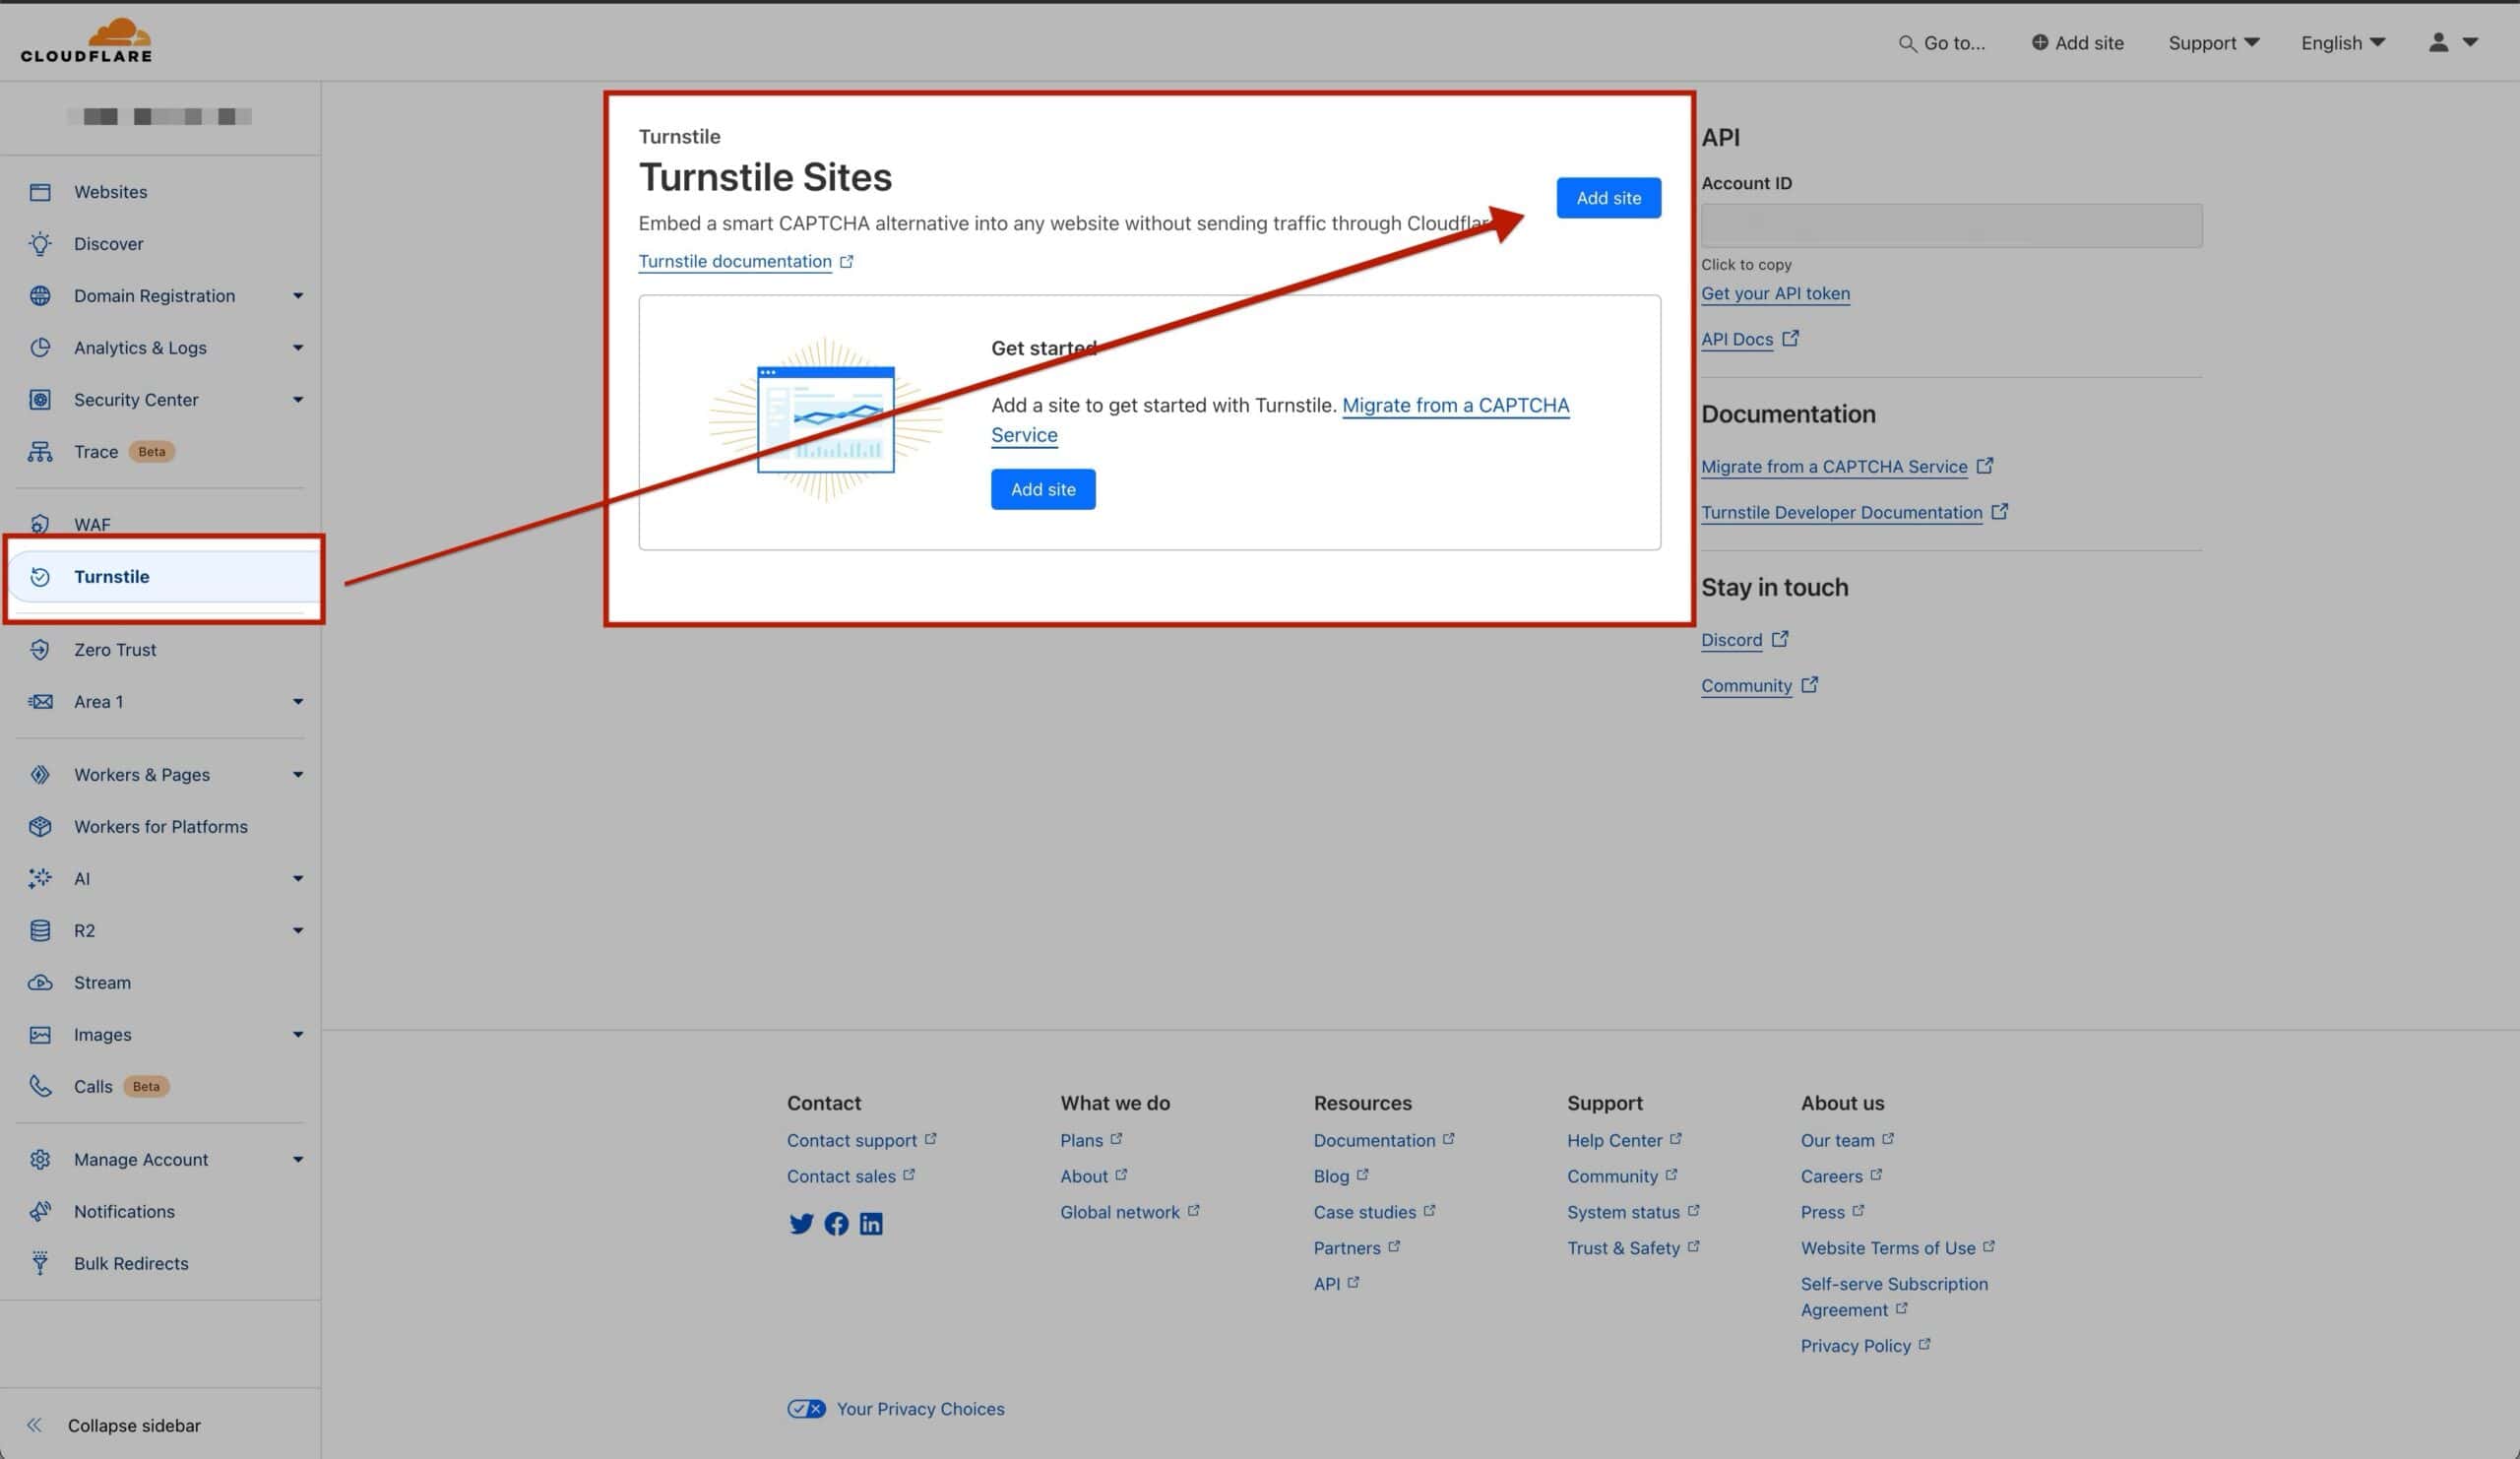
This will require some website details to be filled out.
Set the Site Name to a preferred name for the website. This name serves as a unique identifier within Cloudflare Turnstile.
The Domain setting specifies the domain where the Turnstile Keys will be applied. This domain should match the one where Kadence CAPTCHA is implemented. You can manually enter a custom domain or select from existing connected websites in the Cloudflare account.
Choose between Managed, Non-interactive, or Invisible for the Widget Mode. Managed provides a straightforward Turnstile widget with minimal setup, while Non-interactive operates discreetly in the background. Invisible hides the widget entirely from users.
Decide if you want to opt for pre-clearance for this site. Pre-clearance simplifies access for verified users by automatically recognizing them based on previous verifications. This means that once users are verified through an initial process, they won’t need to go through additional verification steps each time they access your site.
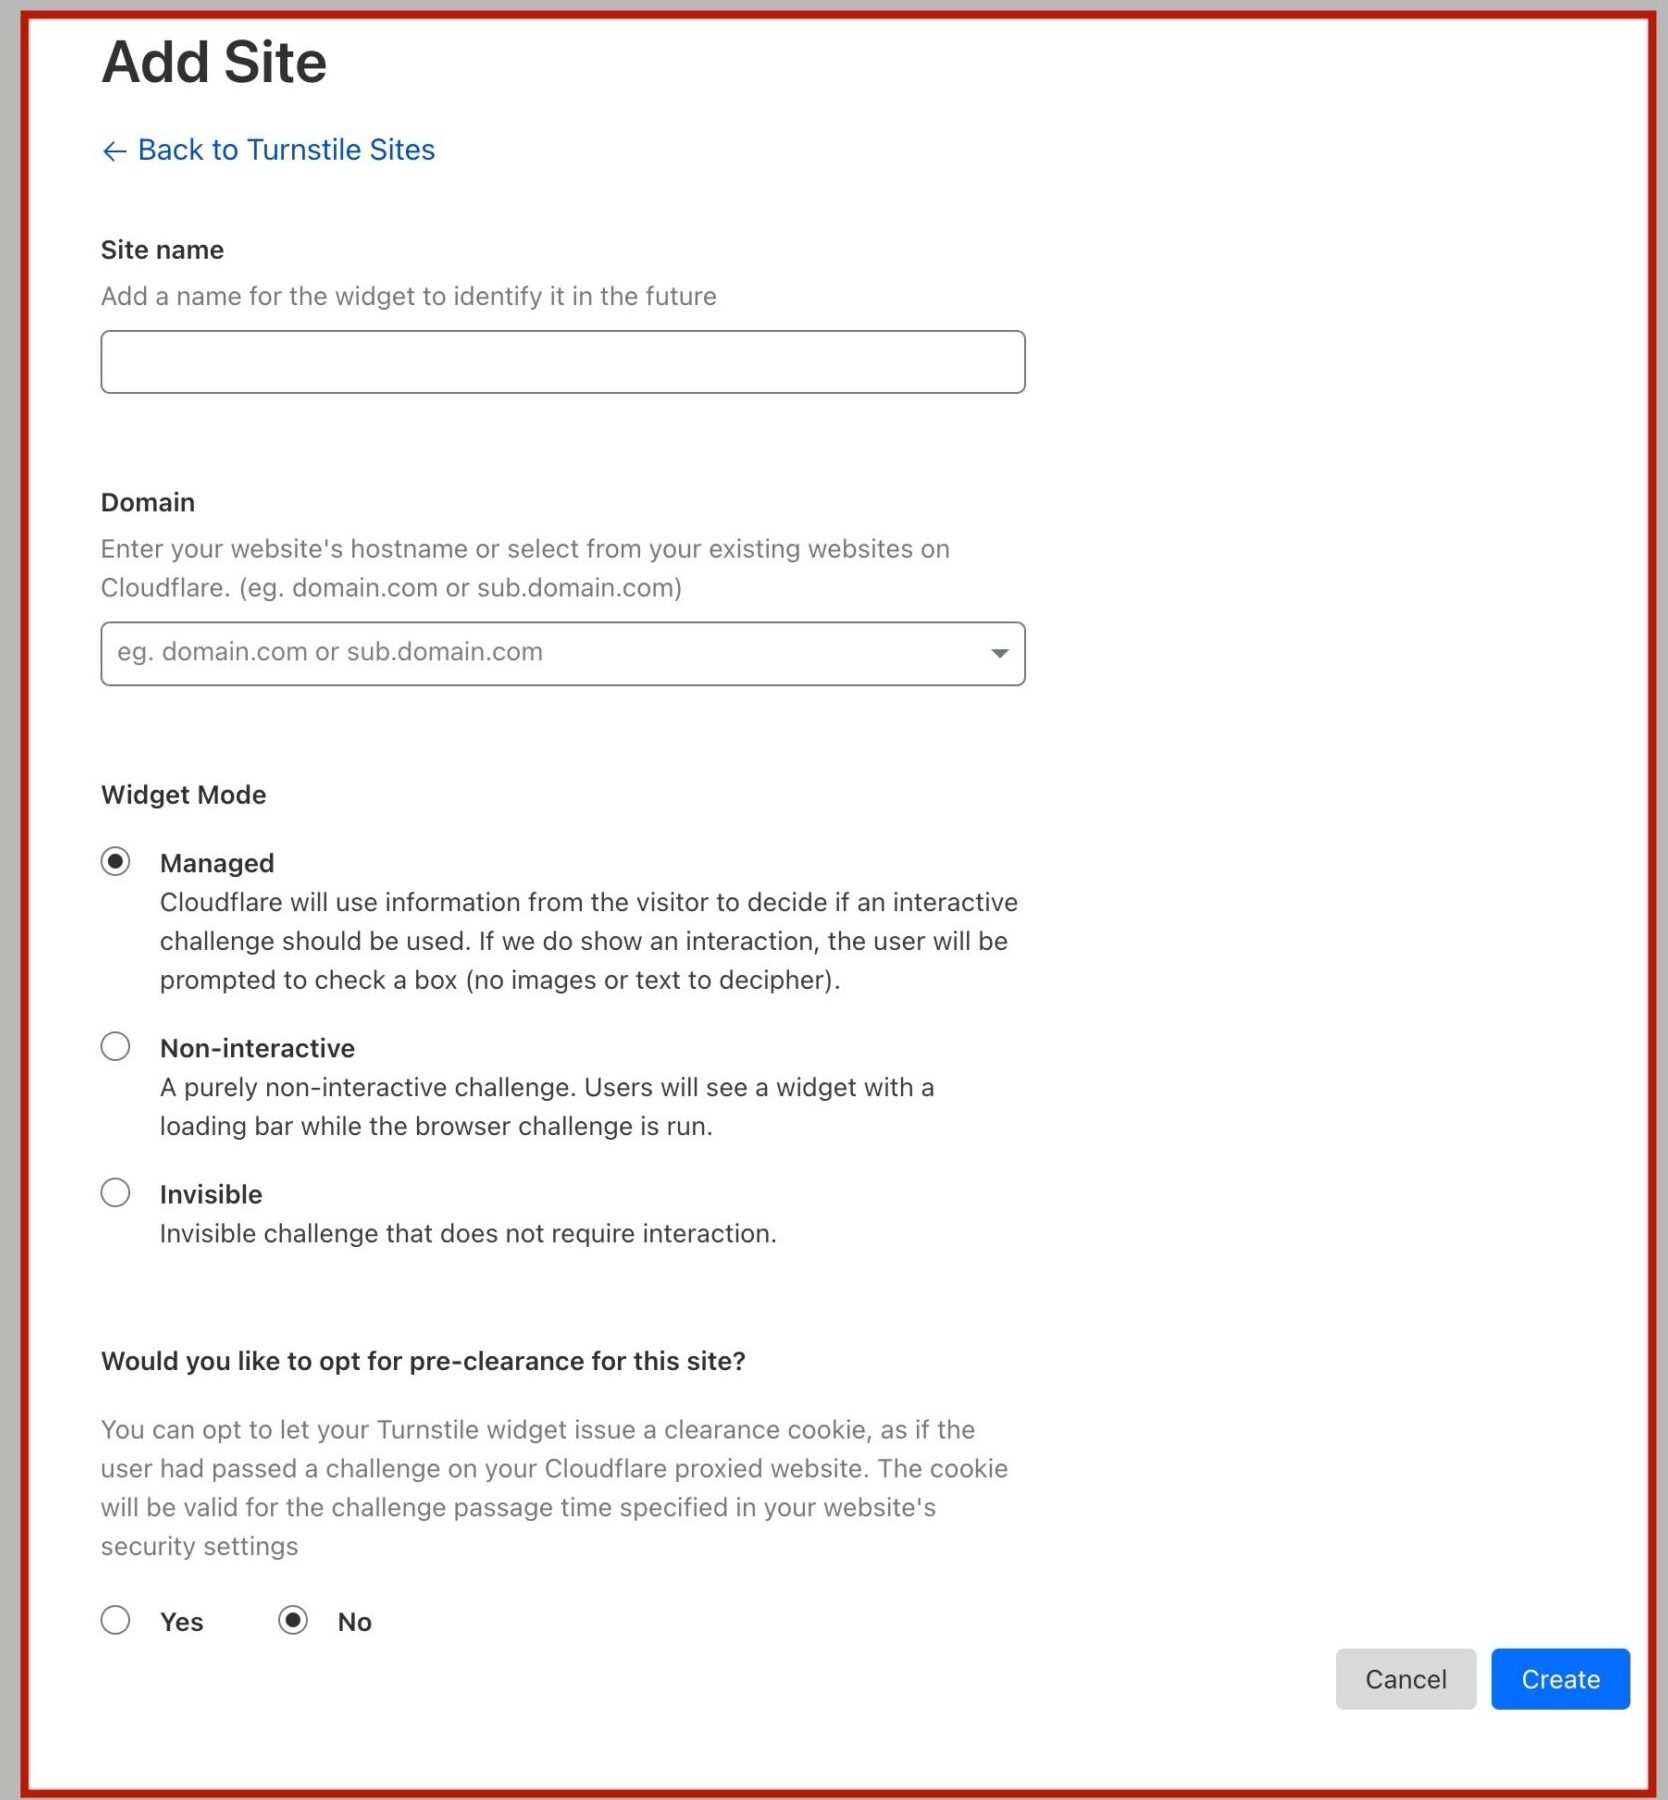
Ensure all details are accurate before completing the registration process for the site with Cloudflare Turnstile. Then click the Create button.
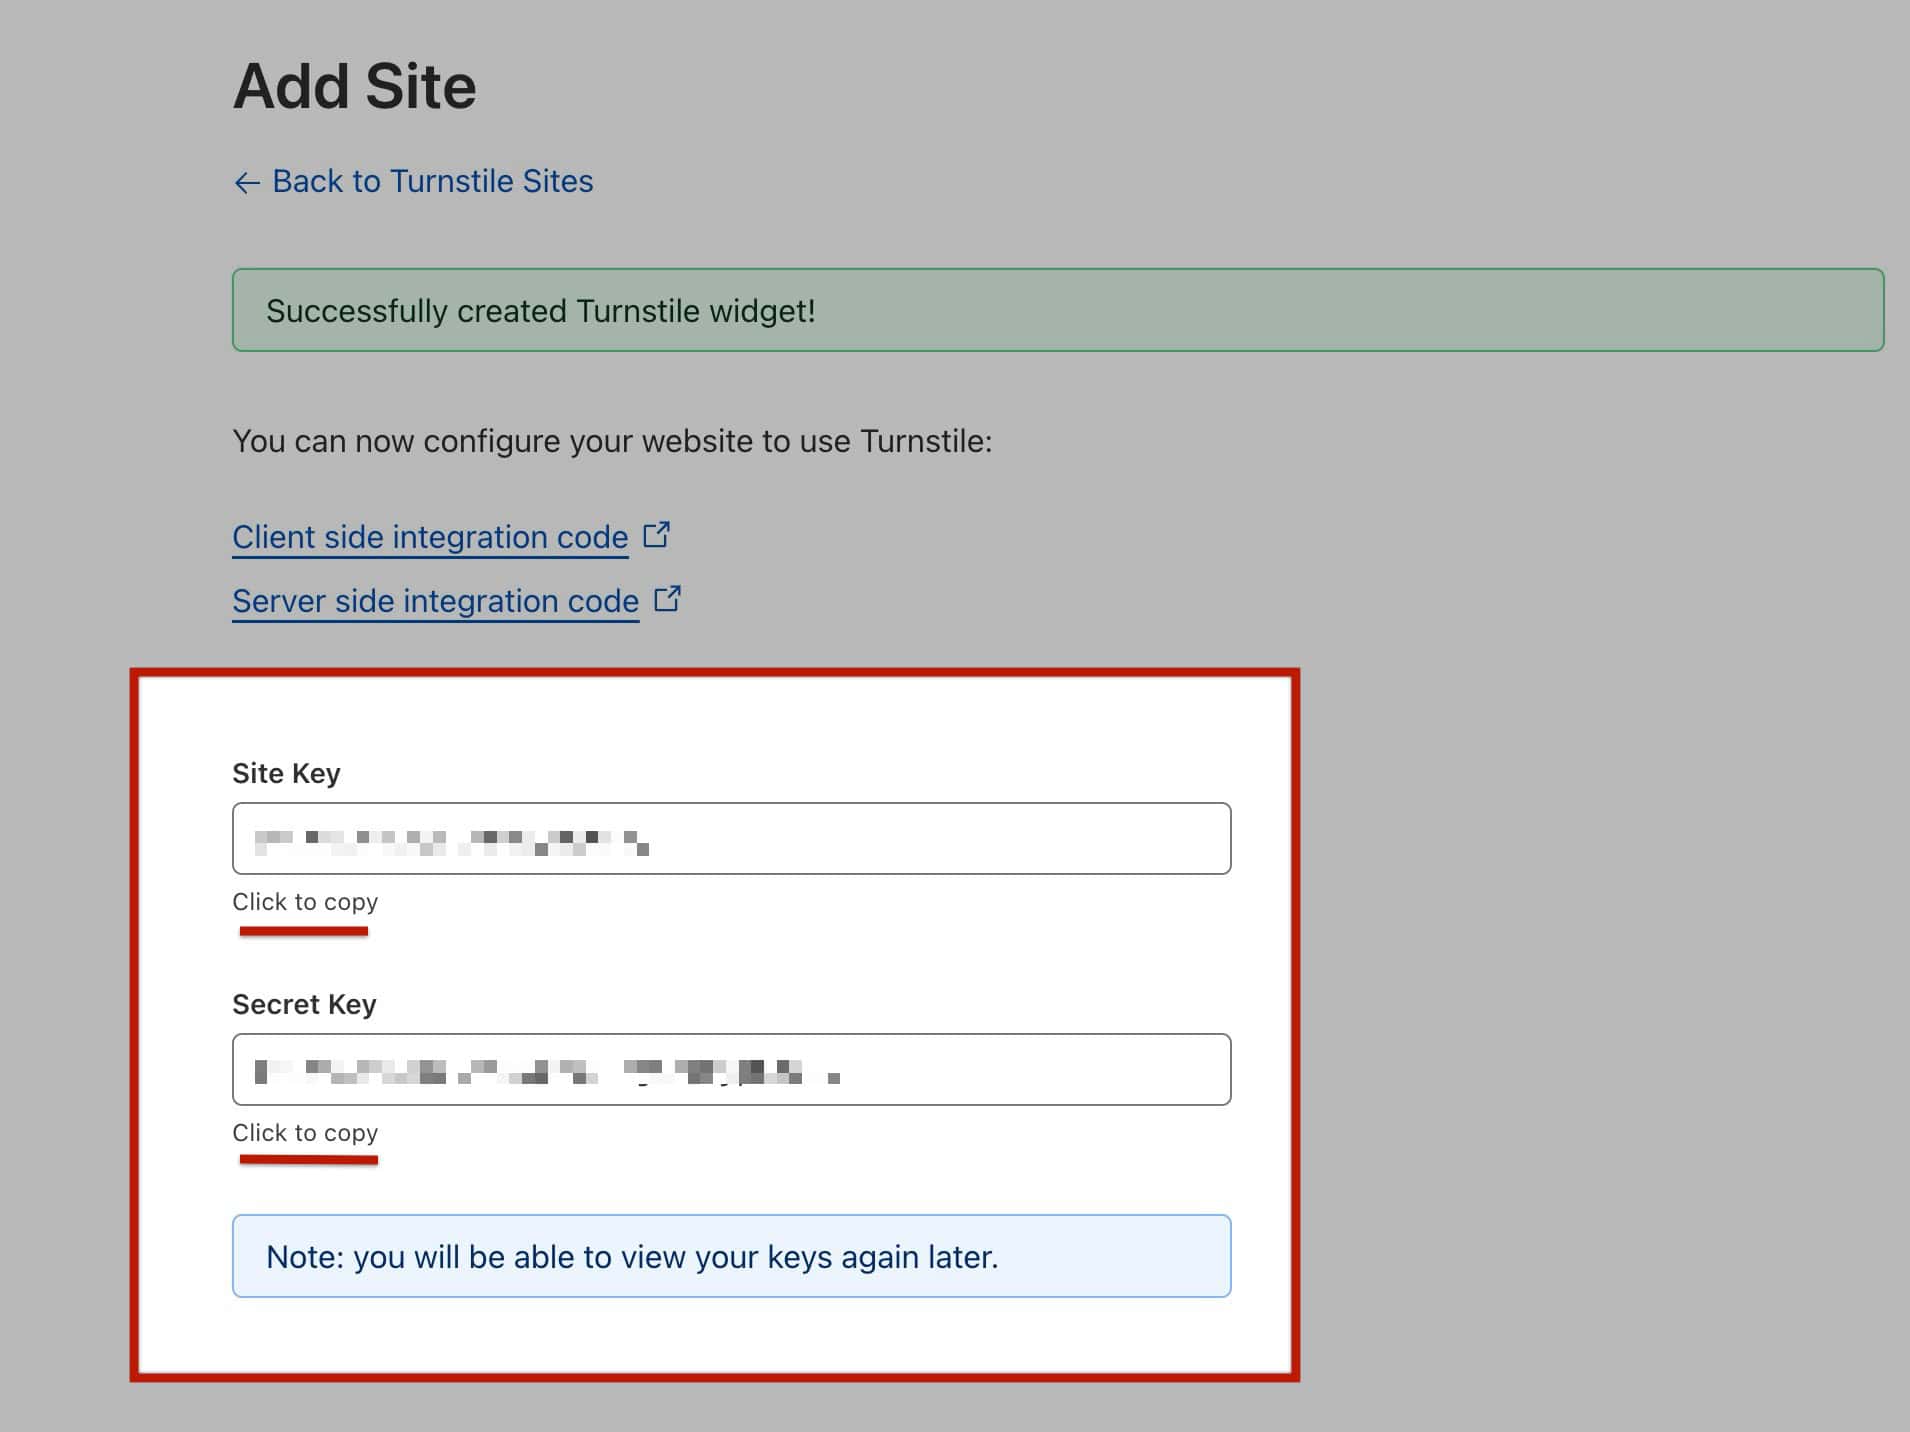
Once the website is added, a popup will display presenting the Site Key and Secret Key. These two keys are required for Kadence CAPTCHA to integrate with Turnstile. It is important to save this page and key details for future reference. (These keys can also be accessed later in the Cloudflare Dashboard)
Inputting Turnstile Keys
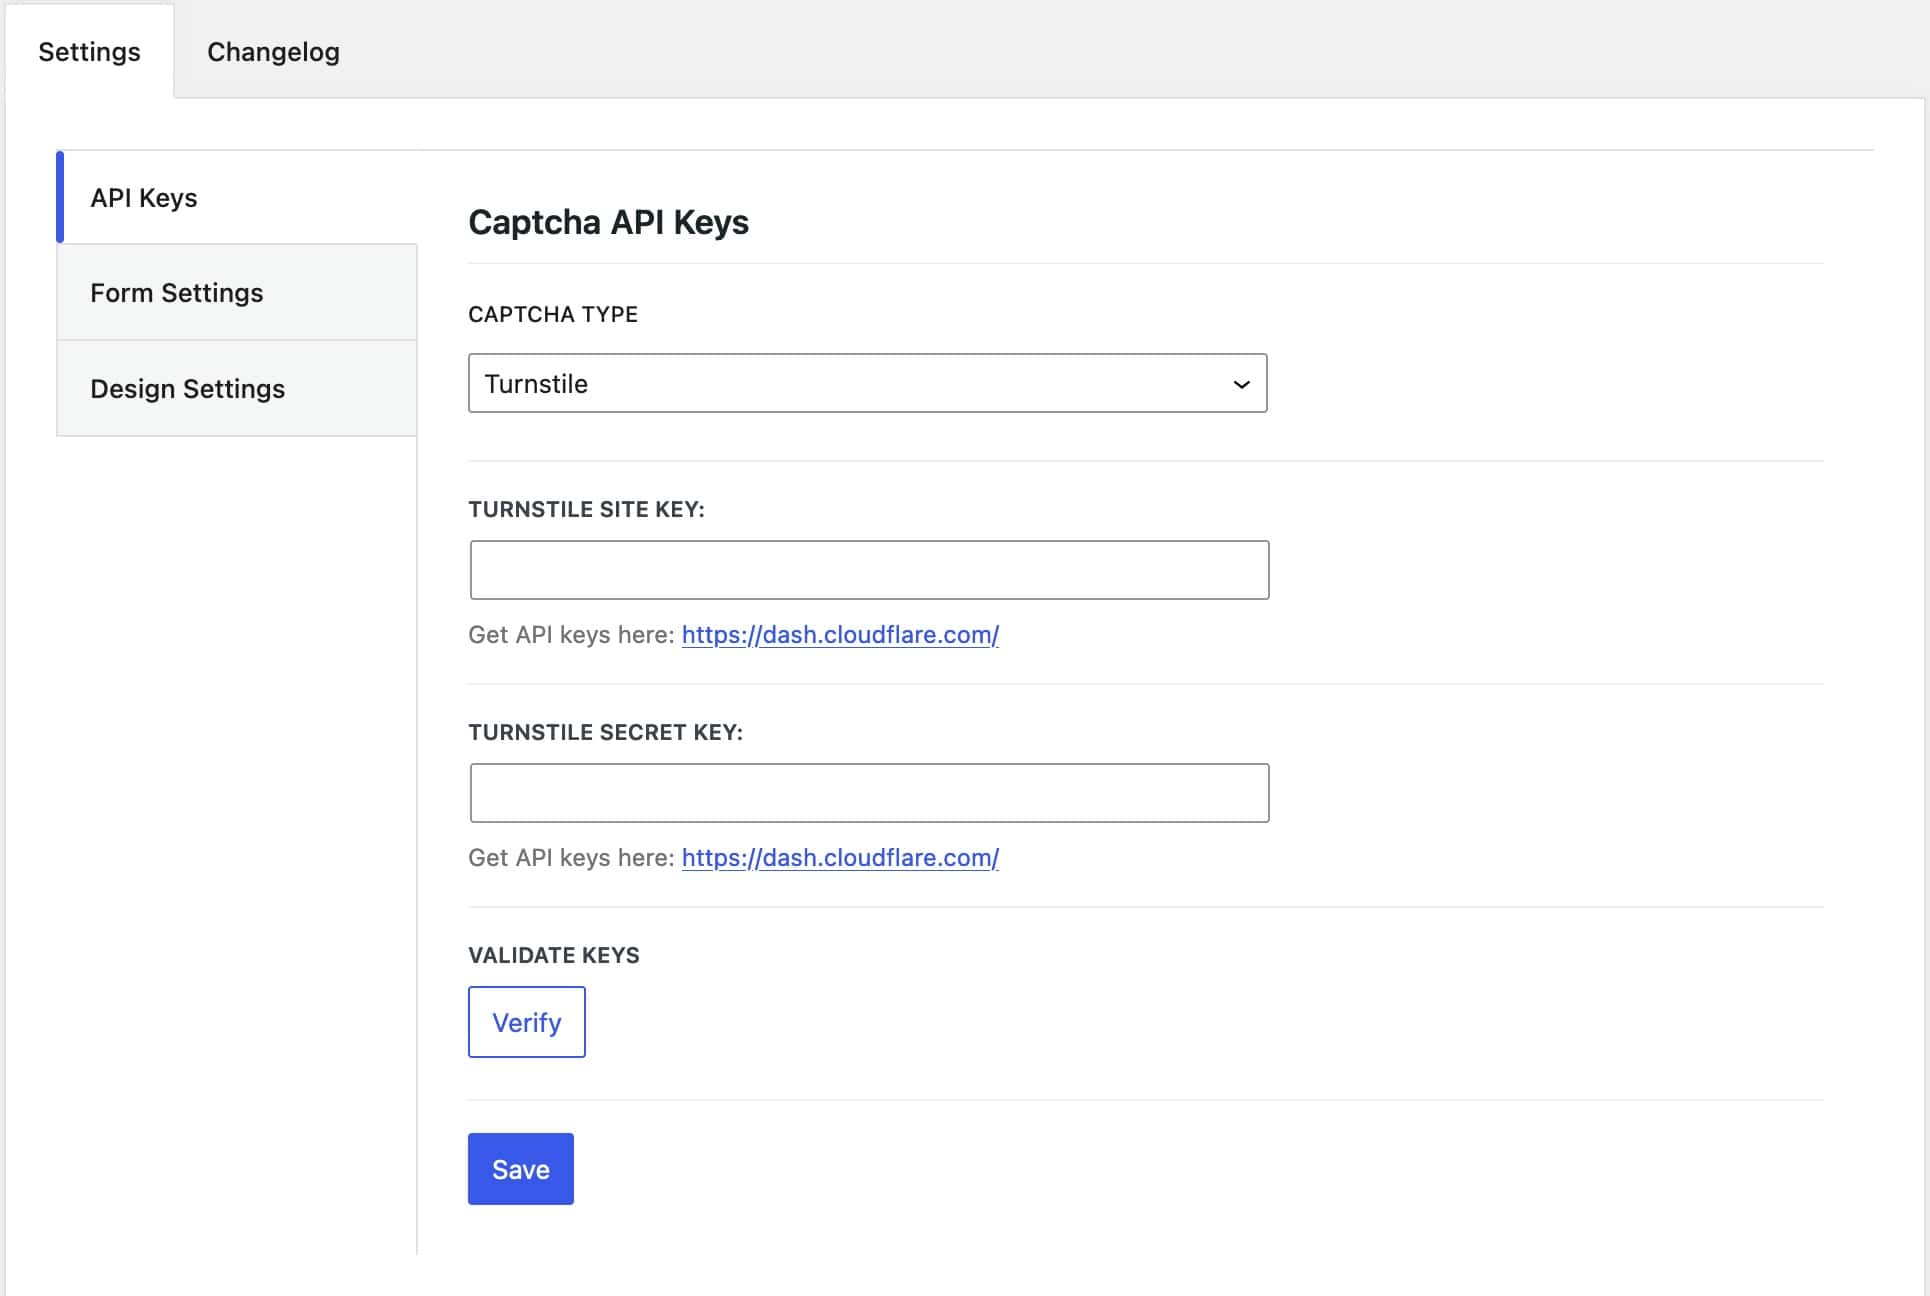
To input Turnstile Keys in Kadence CAPTCHA, go to the Dashboard -> Settings -> CAPTCHA. Under the API Keys tab, select Turnstile from the CAPTCHA Type dropdown.
Set the Turnstile Site Key and Turnstile Secret Key.
Next, click on Verify to validate your keys.
Once the keys are validated, click save.
Kadence CAPTCHA Settings
Once Kadence CAPTCHA is installed on the website, navigate to Dashboard -> Settings -> CAPTCHA Settings. Enter the Google reCAPTCHA Keys and select the CAPTCHA Type. Options include Google v2, Google v3, or Turnstile.
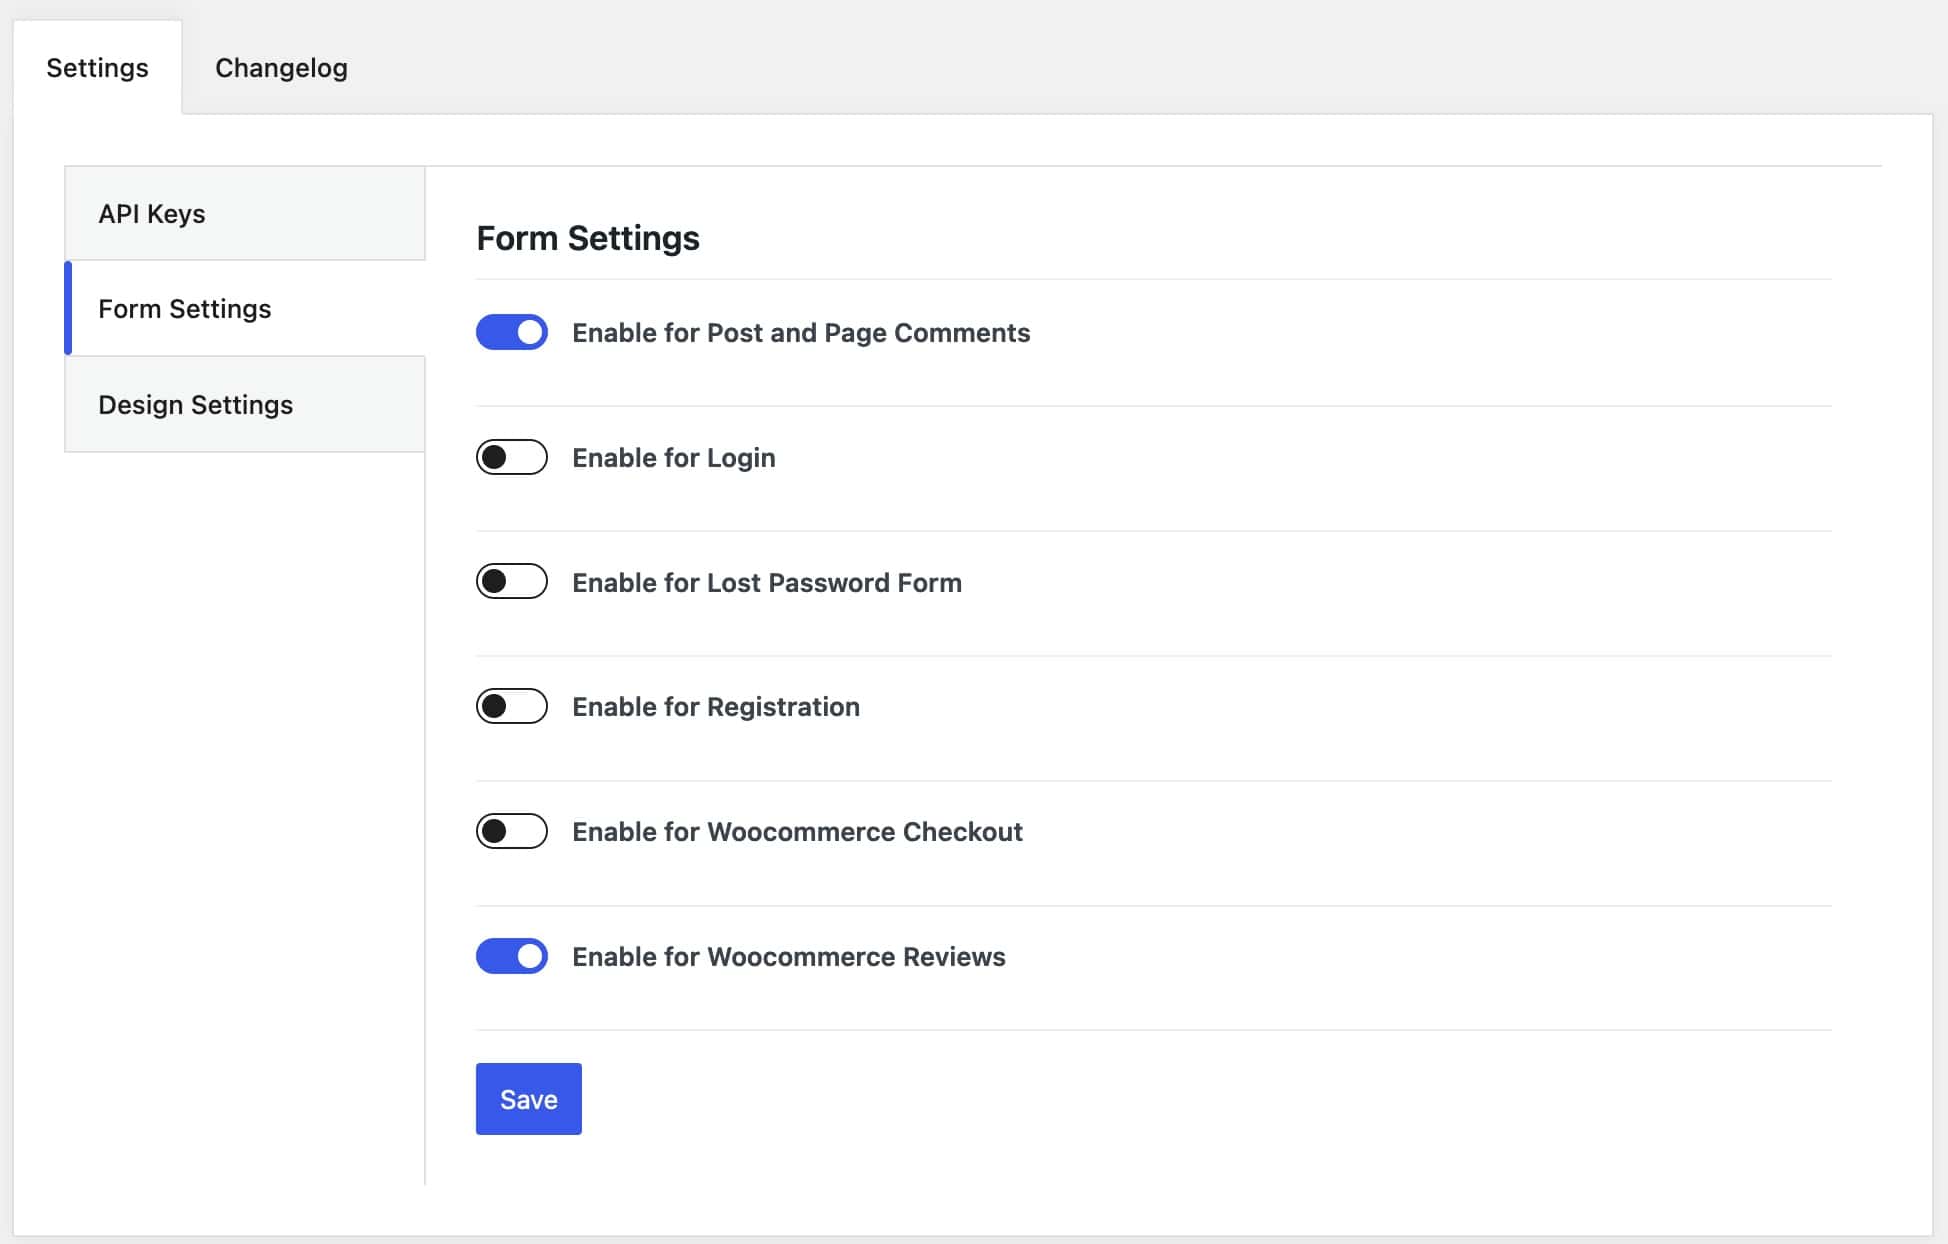
Form Settings
Navigate to the Form Settings tab to enable various CAPTCHA options for your forms. The term “Forms” here encompasses all areas where users may input information, such as logging into an account, submitting a comment, and more.
You can enable CAPTCHA for the following forms;
-Post and Page Comments
-Login Forms
-Lost Password Forms
-Registration Forms
-WooCommerce Checkout Forms
-WooCommerce Review Forms
This ensures enhanced security across different interaction points on your website, protecting against automated submissions and ensuring a smoother user experience.
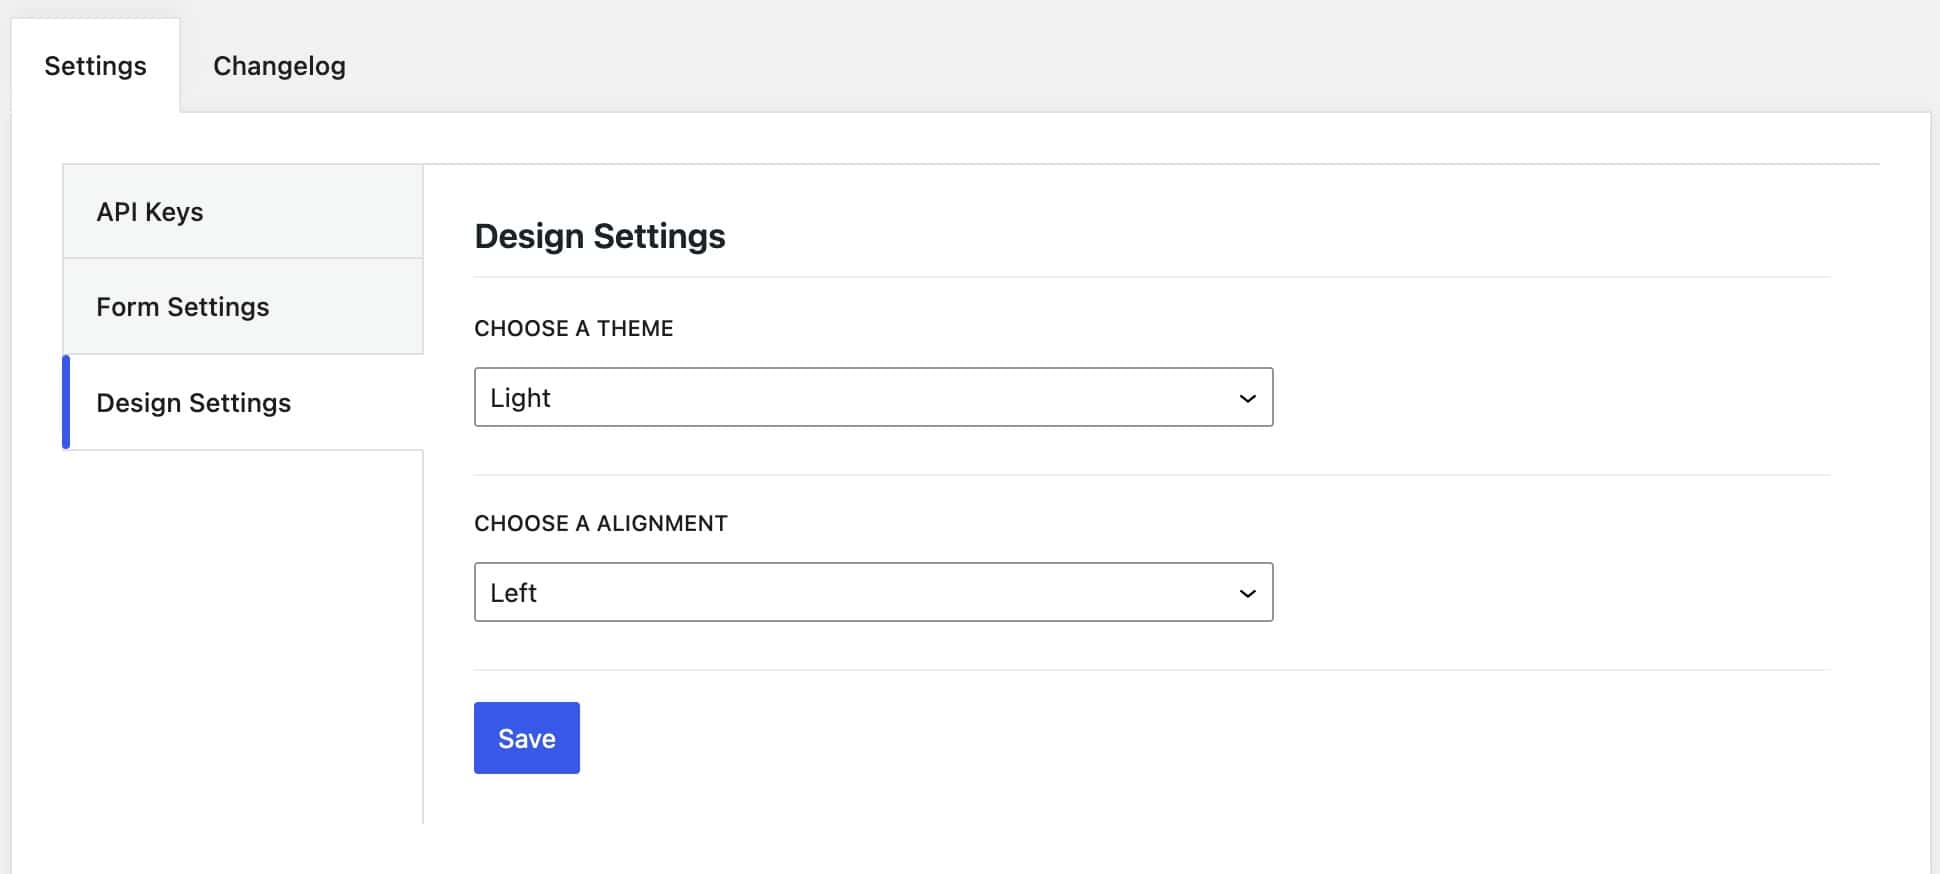
Design Settings
Utilize the Design Settings to customize your CAPTCHA items.
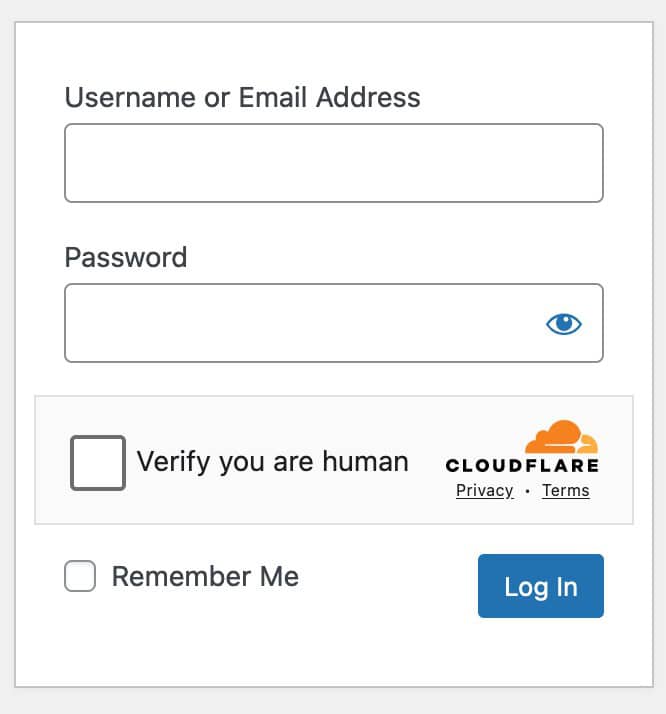
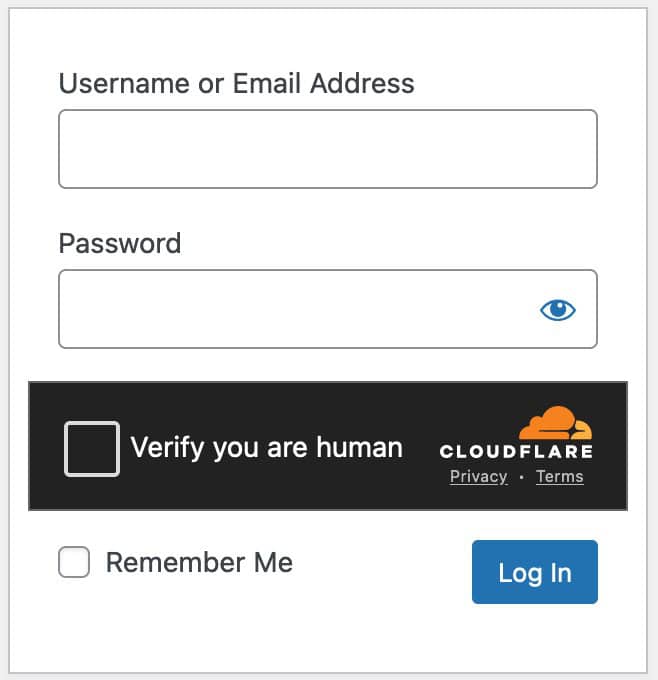
Set the Theme to either Light or Dark.
Adjust the Alignment to Left, Right, or Center as desired.
Captcha Light Sample
Captcha Dark Sample
Alignment Sample