Skip to content
Help Center
  • Pricing
  • ProductsExpand
    • Premium BundlesGet all the tools you need in one bundle
    • Kadence ThemeLightning-fast performance theme for modern websites
    • Kadence BlocksDrop in ready designs with advanced controls for pixel perfect websites
    • Kadence Shop KitCreate a more effective WooCommerce shopping experience
    • Kadence ConversionsBoost sales and build engaged audiences with popups and banners
    • Kadence InsightsEasily create A/B tests. Optimize your pages to drive higher conversions.
    • View All Products
  • AI Starter Templates
  • Blog
  • SupportExpand
    • Help CenterProduct Questions? Not sure how to do something? Start here
    • Support TicketsNeed help? We love to help our customers
    • About usCrafted with love in Missoula, Montana
    • Contact usPre Sale Questions? Need help purchasing?
Account Account
Get Kadence
Kadence Shop Kit
  • Features
  • Pricing
  • HelpExpand
    • Documentation
    • Submit a Ticket
    • Feature Requests
    • Roadmap
    • Changelog
Help Center
Kadence Shop Kit

Shop Kit Setup

  • Kadence Shop Kit – Product Badges
  • Kadence Shop Kit: Variation Swatches
  • Kadence Shop Kit: Product Galleries
  • Kadence Shop Kit – Advanced Reviews
  • Kadence Shop Kit – Product Brand Configuration
  • Kadence Shop Kit – Open Affiliate/External Products In A New Tab
  • Enable Custom Add to Cart Text
  • How to Set Variation Options
  • Shop Kit 2.0 – Building a Product Template
  • Kadence Shop Kit: Size Charts
  • Enable and Add Global Tabs
  • Snackbar Style Notices
  • Kadence Shop Kit Conditional Cart Banners
  • Checkout Coupon Modal
  • Kadence Shop Kit – Customize Checkout
  • Extra Category Description
  • How to Install & Activate Kadence Shop Kit
  • How to Add Gutenberg Editor to WooCommerce

Woo Template Blocks

  • Woo Template Block – Product: Upsell
  • Woo Template Block – Product: Custom Actions
  • Woo Template Block – Product: Add to Cart
  • Woo Template Block – Product: Title
  • Woo Template Block – Product: Price
  • Woo Template Block – Product: Gallery
  • Woo Template Block – Product: Image
  • Woo Template Block – Product: Short Description
  • Woo Template Block – Product: Description
  • Woo Template Block – Product: Meta
  • Woo Template Block – Product: Tabs
  • Woo Template Block – Product: Rating
  • Woo Template Block – Product: Related
  • Woo Template Block – Product: Upsell
  • Woo Template Block Product: Additional Information
  • Woo Template Block – Product: Reviews Block
  • Woo Template Block – Breadcrumbs
  • Woo Template Block – Product: Notice
  • Woo Template Block – Product: Brand
  • Woo Template Block – Archive: Main Query
  • How to Enable Woo Template Blocks
  • Select a Product for Preview in Woo Template

Kadence Shop Kit

  • Woo Template Block – Product: Custom Actions
  • Home
  • Knowledge Base
  • Kadence Shop Kit
  • Kadence Shop Kit
  • Shop Kit Setup

Shop Kit 2.0 – Building a Product Template

With Kadence Blocks 2.0 you now have the ability to build custom product templates. You can assign product templates to specific products, or groups of products, giving them a powerful customized style and feel that matches your brand. When you utilize a Product Template, the settings in your Customizer -> WooCommerce Settings are overridden, and the Product Template settings take precedence. These settings can be customized using Block Settings within your Product Template.

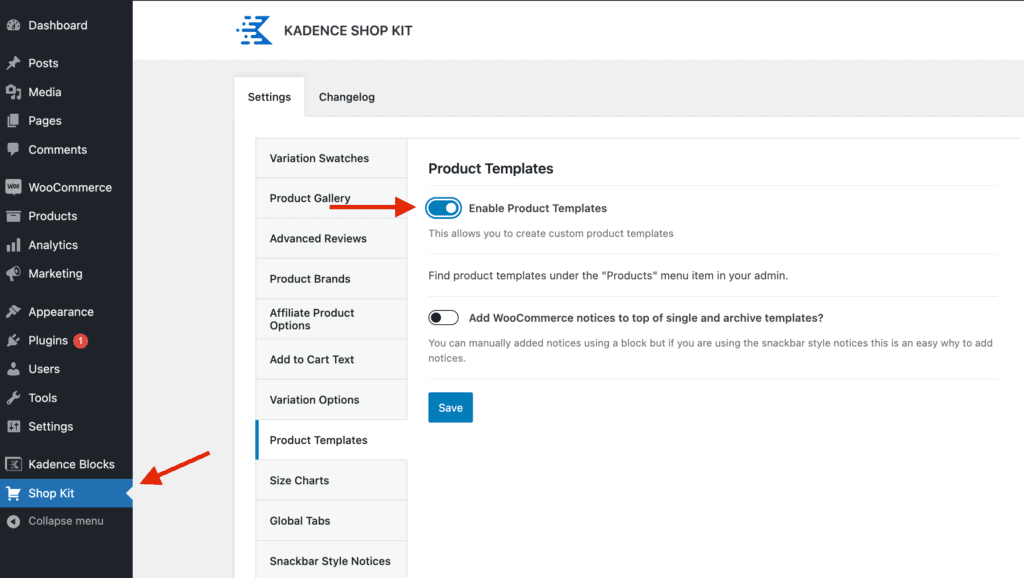
Step 1: Enable the Product Templates

The first step is to enable Product Templates. From your Dashboard, navigate to Shop Kit > Product Templates and toggle on “Enable Product Templates.”

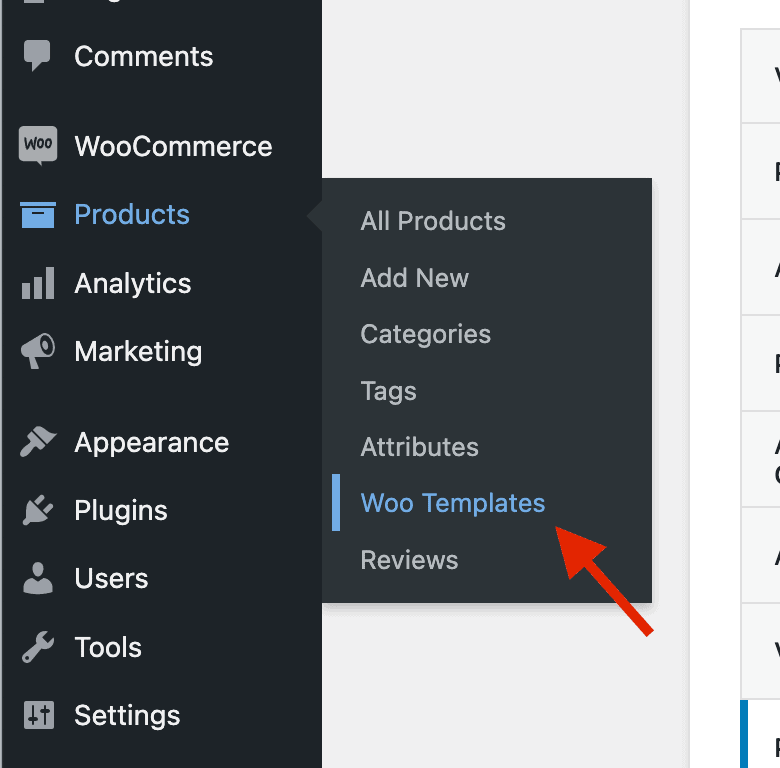
Save and refresh your screen, then navigate to Products > Woo Templates. Add a new template and select Single Product.

Step 2: Build the Template

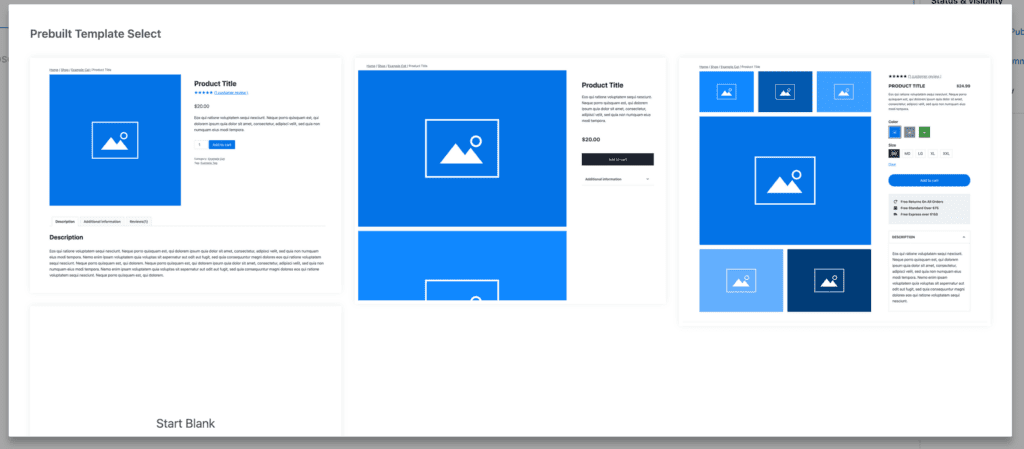
Next, you can either select a prebuilt template, or start blank and create your own.

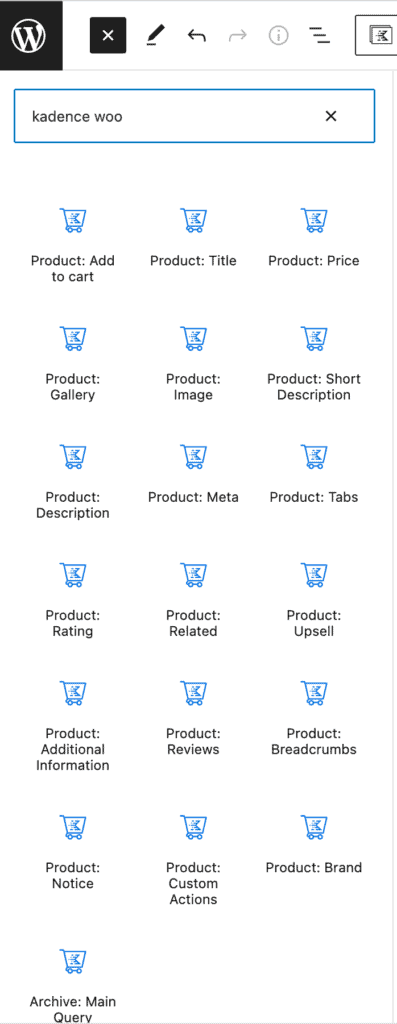
Creating a custom product template means you can get as creative as you want! You will find all of the Kadence WooCommerce blocks in your Blocks list. However, you are not limited! Feel free to add any block to your template, making it as simple or elaborate as you’d like!

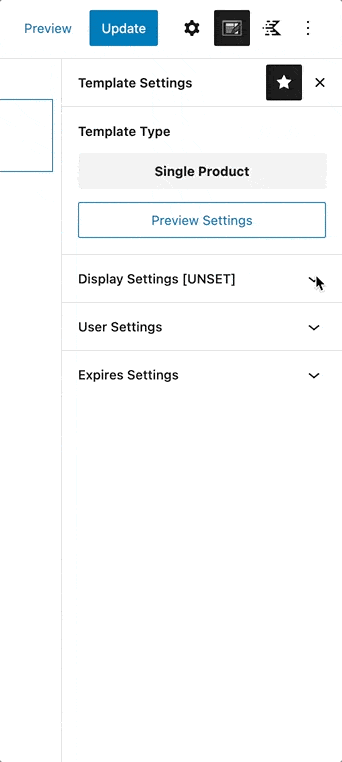
Step 3: Set the Template Settings

Once your custom template is complete, you can assign it to your products. Open your Template Settings (right upper corner of your edit page) and under the Display Settings you can choose to individually assign this template, or assign it based on a specific product category or tag. You can even choose to exclude specific products within a group.

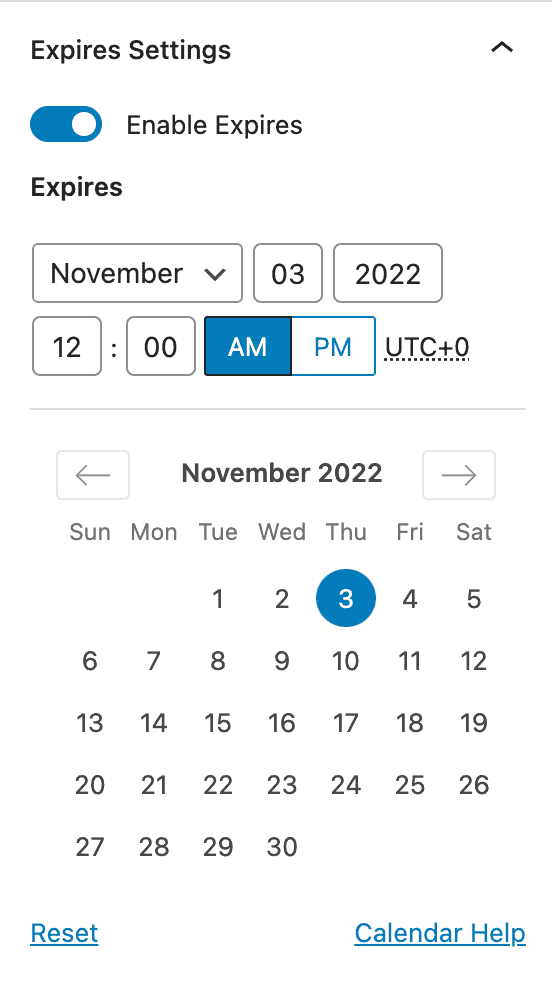
The Expire Settings allow you to set a timeline for a custom template to have effect on certain products. Let’s say you’re running a sale on a product or on a specific category of products. You can create a product template designed to market the sale, then once the sale ends you can use the Expire Settings to reset the product back to the template is was previously assigned to.

That’s it! You can now enjoy your beautifully designed custom product templates.

How to Set Variation OptionsKadence Shop Kit: Size Charts
  • Pricing
  • Products
    • Premium BundlesGet all the tools you need in one bundle
    • Kadence ThemeLightning-fast performance theme for modern websites
    • Kadence BlocksDrop in ready designs with advanced controls for pixel perfect websites
    • Kadence Shop KitCreate a more effective WooCommerce shopping experience
    • Kadence ConversionsBoost sales and build engaged audiences with popups and banners
    • Kadence InsightsEasily create A/B tests. Optimize your pages to drive higher conversions.
    • View All Products
  • AI Starter Templates
  • Blog
  • Support
    • Help CenterProduct Questions? Not sure how to do something? Start here
    • Support TicketsNeed help? We love to help our customers
    • About usCrafted with love in Missoula, Montana
    • Contact usPre Sale Questions? Need help purchasing?
Account Login
  • Features
  • Pricing
  • HelpExpand
    • Documentation
    • Submit a Ticket
    • Feature Requests
    • Roadmap
    • Changelog