
Advanced Header Blocks provide the flexibility to add any Block within them, offering a high degree of customization for your website’s header. While this capability is advantageous, it can also lead to potential pitfalls. Since the Header loads on every page and appears above the fold, it becomes part of the first content users encounter. Therefore, it is essential to avoid overloading the Header to maintain an efficient website.
For instance, utilizing complex Queries from blocks such as the Post Grid/Carousel Block and the Advanced Query Loop Block can burden the Header and negatively impact performance. Additionally, while you may consider using an Info Box to display information alongside media, the Navigation Link Block already supports media, title text, and description text while requiring less code and nesting. By adopting these best practices, you can enhance your website’s efficiency and user experience.

Tip: Sub Menus are a great way to organize content efficiently, helping to reduce the number of links displayed upfront and improving the overall user experience during the initial page load.
Tip: Mega Menus (Pro) are an excellent way to display additional header content. By placing extra items within a Mega Menu, you can streamline the main header and reduce clutter, offering a cleaner navigation experience.
Learn more about using Sub Menus and Mega Menus (Pro) by clicking here.
Understanding Dom Size
The Document Object Model (DOM) represents the structure of a webpage as a tree of objects. Each element, including headers, images, paragraphs, and other content, corresponds to a node in this tree. When a webpage has an excessive DOM size, it can lead to several performance issues like slower page loading times.
Impact of an Excessive DOM Size:
- Diminished Interactivity: A bloated DOM can slow down JavaScript execution and event handling, leading to a less responsive and less interactive user experience.
- Slower Page Load Times: A large DOM can result in longer rendering times, causing delays in how quickly the content appears on the page.
- Increased Memory Usage: Browsers must allocate more resources to manage larger DOMs, which can impact overall performance.
When creating new Advanced Headers, it’s crucial to implement strategies that prevent an overly complex DOM. Here are some tips to help you maintain a manageable DOM size:
- Choose Blocks Wisely: Be mindful of the blocks you use inside Advanced Headers. For example, instead of using the Info Box Block, which can add unnecessary bulk, consider using the Navigation Link Block. It provides similar functionality with less impact on the DOM.
- Avoid Heavy Scripts in Headers: Advanced blocks that require significant scripts can lead to performance issues. For instance, placing the Advanced Query Loop Block with Filtering Block options inside a Mega Menu may not be ideal, as it could slow down your site. Consider simpler layouts with more basic blocks, these will reduce scripts, and also keep your nav cleaner and more focused.
- Utilize the Navigation Link Block: The Navigation Link Block is specifically designed for Navigation/Header Items and offers the ability to display a title, icon, and description text while allowing for customization of their placement. This can help avoid adding extra blocks that aren’t optimized for header use. Learn about all of the features of the Navigation Link Block here.
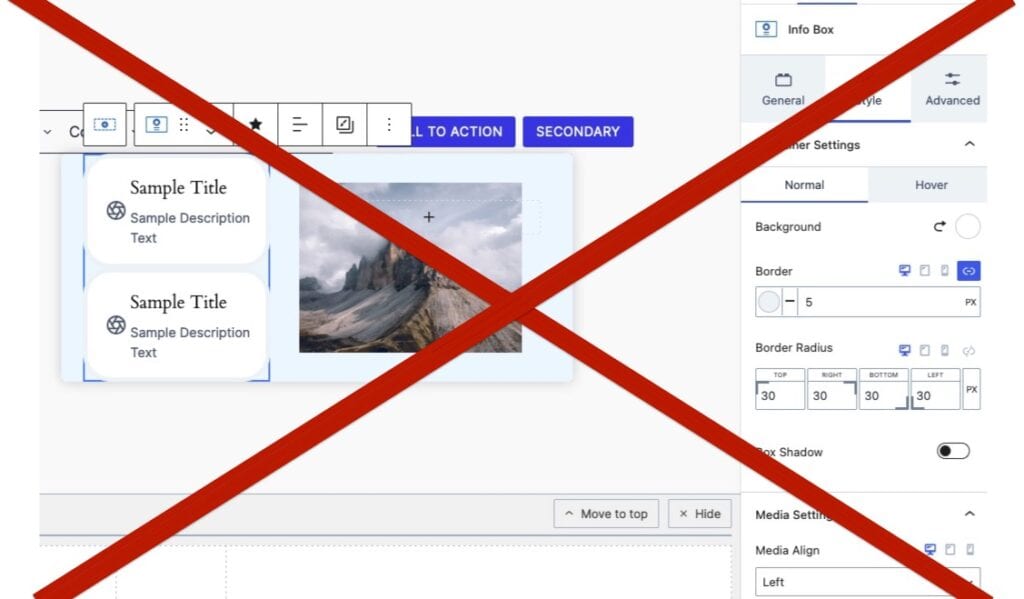
Info Box Blocks are not recommended inside of Advanced Headers. This is for inside and outside of Mega Menus.
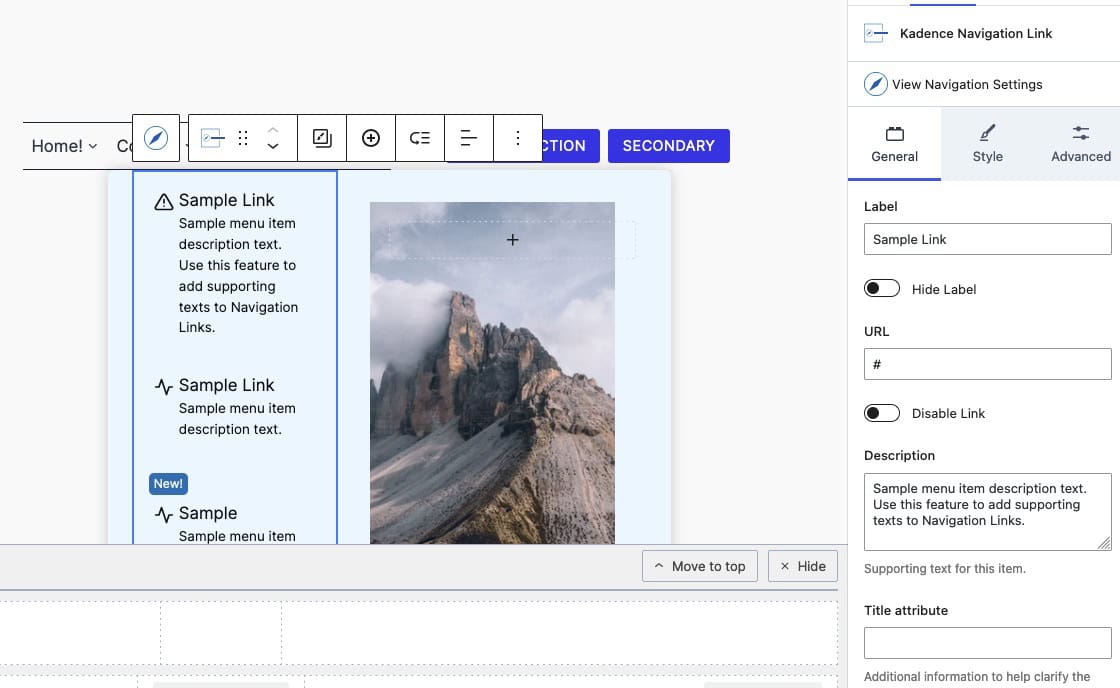
The Navigation Link Block can be used to create the same structures that Info Boxes provide. It is also more efficient and specifically designed for Advanced Headers.
Importance of Above the Fold Content
The term Above the Fold refers to the portion of a webpage that is visible on the initial page load without scrolling. This area is crucial for user engagement, as it’s the first impression visitors have of your site. The content displayed here can significantly influence user behavior, including whether they choose to stay on the page or leave.
Impacts of Above-the-Fold Content
- Longer Perceived Load Times: Overloading the header with heavy elements like multiple large images, complex scripts, or videos can delay the rendering of the Above the Fold content, making the site feel slow to users.
- Diminished User Experience: When Above the Fold content is slow to load, it can cause users to perceive the entire site as sluggish or unresponsive. This can reduce engagement and discourage users from interacting with your content further.
- Increased Server Load: Heavy Above the Fold content requires more server resources to deliver quickly. If your server struggles to keep up, it can lead to slow load times, especially during traffic spikes.
- Reduced Accessibility: Delays in loading Above the Fold content can impact users with slower internet connections or less powerful devices, reducing the overall accessibility of your site.
it’s essential to ensure that the content above the fold is optimized for performance. Here are some best practices to keep your Above the Fold content efficient:
- Limit the Use of High-Resolution Images and Videos: Instead of placing large media files in the header, consider using a Transparent Header on a page where the video or images are part of the main content. This keeps the header lightweight and ensures faster load times.
- Avoid Heavy Galleries and Multiple High-Resolution Images: Including multiple Advanced Gallery Blocks or an excessive amount of high-resolution images in the header can significantly increase the page’s initial load time. Such elements are best placed below the fold or on dedicated pages, where they won’t impact the speed and performance of the crucial Above the Fold content.
- Minimize the Use of AOS Animations & Typed Text Effects (Pro): AOS (Animate On Scroll) animations and effects like Typed Text can enhance visual appeal, but overusing them in the Above the Fold area can delay content rendering and impact performance. Use these features sparingly to maintain quick load times and ensure that your header doesn’t become a bottleneck for user experience.
- Focus your header: Only include the most important links and content in your header. Headers with lots of content take up a lot of above-the-fold space. You can often reduce a two or three row header to one by moving less critical links to a sub menu, footer, or landing page. Doing so creates more space to highlight main page content above the fold.
- Build for desktop and mobile: The Header Builder provides block areas to build unique headers for desktop headers, tablet/mobile headers, and the off canvas area. Take advantage of this to build a header that takes advantage of the extra real estate on desktop, then make a simpler layout on mobile with an off canvas navigation.
Implementing Advanced Headers
For Full Site Editing websites, it is recommended to use the Header Block as the primary block in your header template. For classic sites, utilizing Kadence Elements to replace the header and incorporating the Header Block within the element is advisable.
Click here to learn more about adding Advanced Headers to Full Site Editing websites.
Click here to learn more about how to implement Advanced Headers to Classic WordPress Themes.
